**“一种用于API的查询语言。”**
🌚看到 GraphQL 官网的这句介绍大概人人都是一脸懵逼的,写过 API、用过数据库查询语言,还就没见过用于 API 的查询语言。大概是因为我们平常所见的大多都是 RESTful API,而大量 B/S 模式的应用程序也让我们只倾向于「客户端发送请求获取数据,服务端处理请求返回数据」、客户端与服务端交互的方式只能利用 HTTP 协议中 GET、POST、PUT、DELETE 等 HTTP 动词的传统认知。
而 GraphQL 正是要打破这种认知的技术。在 GraphQL 中,客户端可以不多不少地获得其想要的数据,因为 GraphQL 中控制返回数据的是客户端,而不是 RESTful API 中完全取决于服务端(前端出人头地的时候到了?🧐)。其次,前端与后端交互的方式也由 HTTP 动词转变为 GraphQL 提供的 Query 和 Mutation 等。
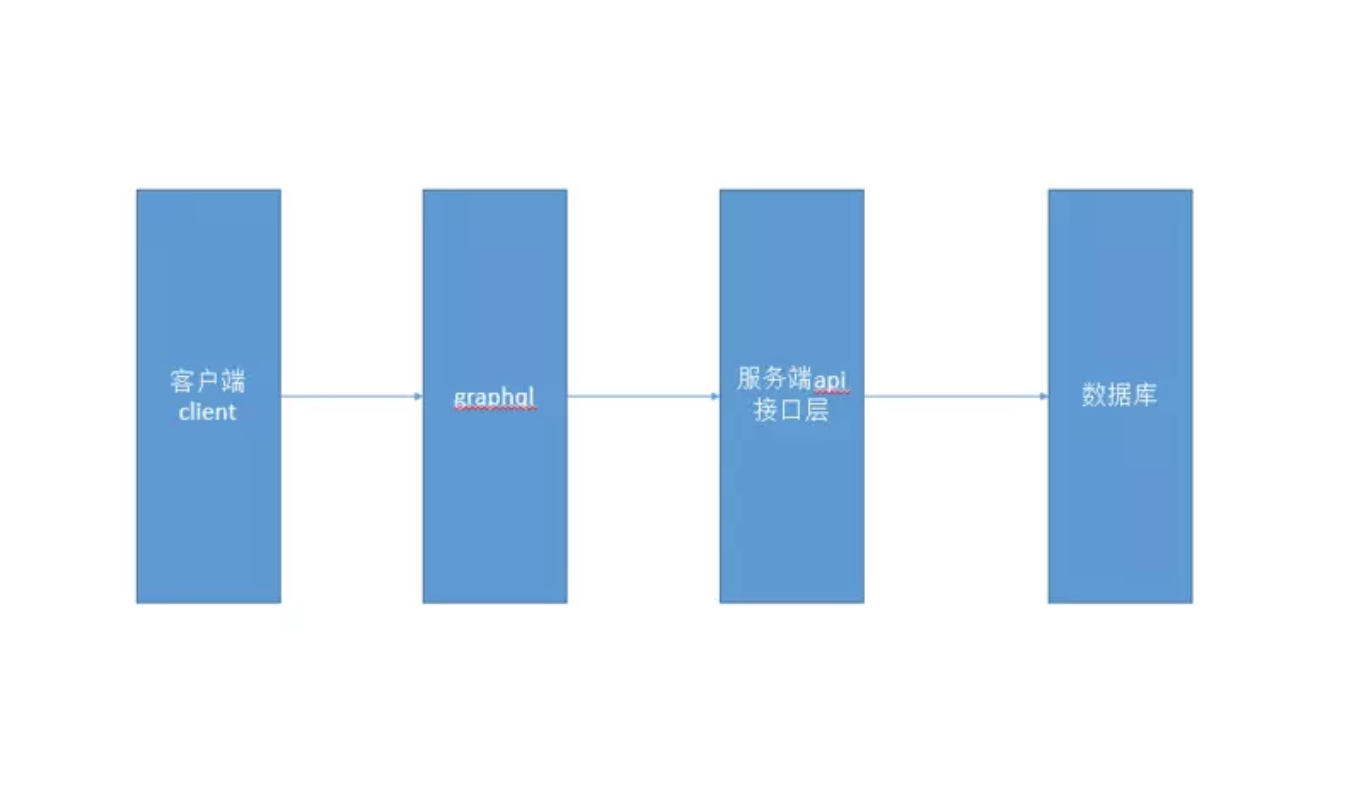 ◎ GraphQL 在应用中所处的位置
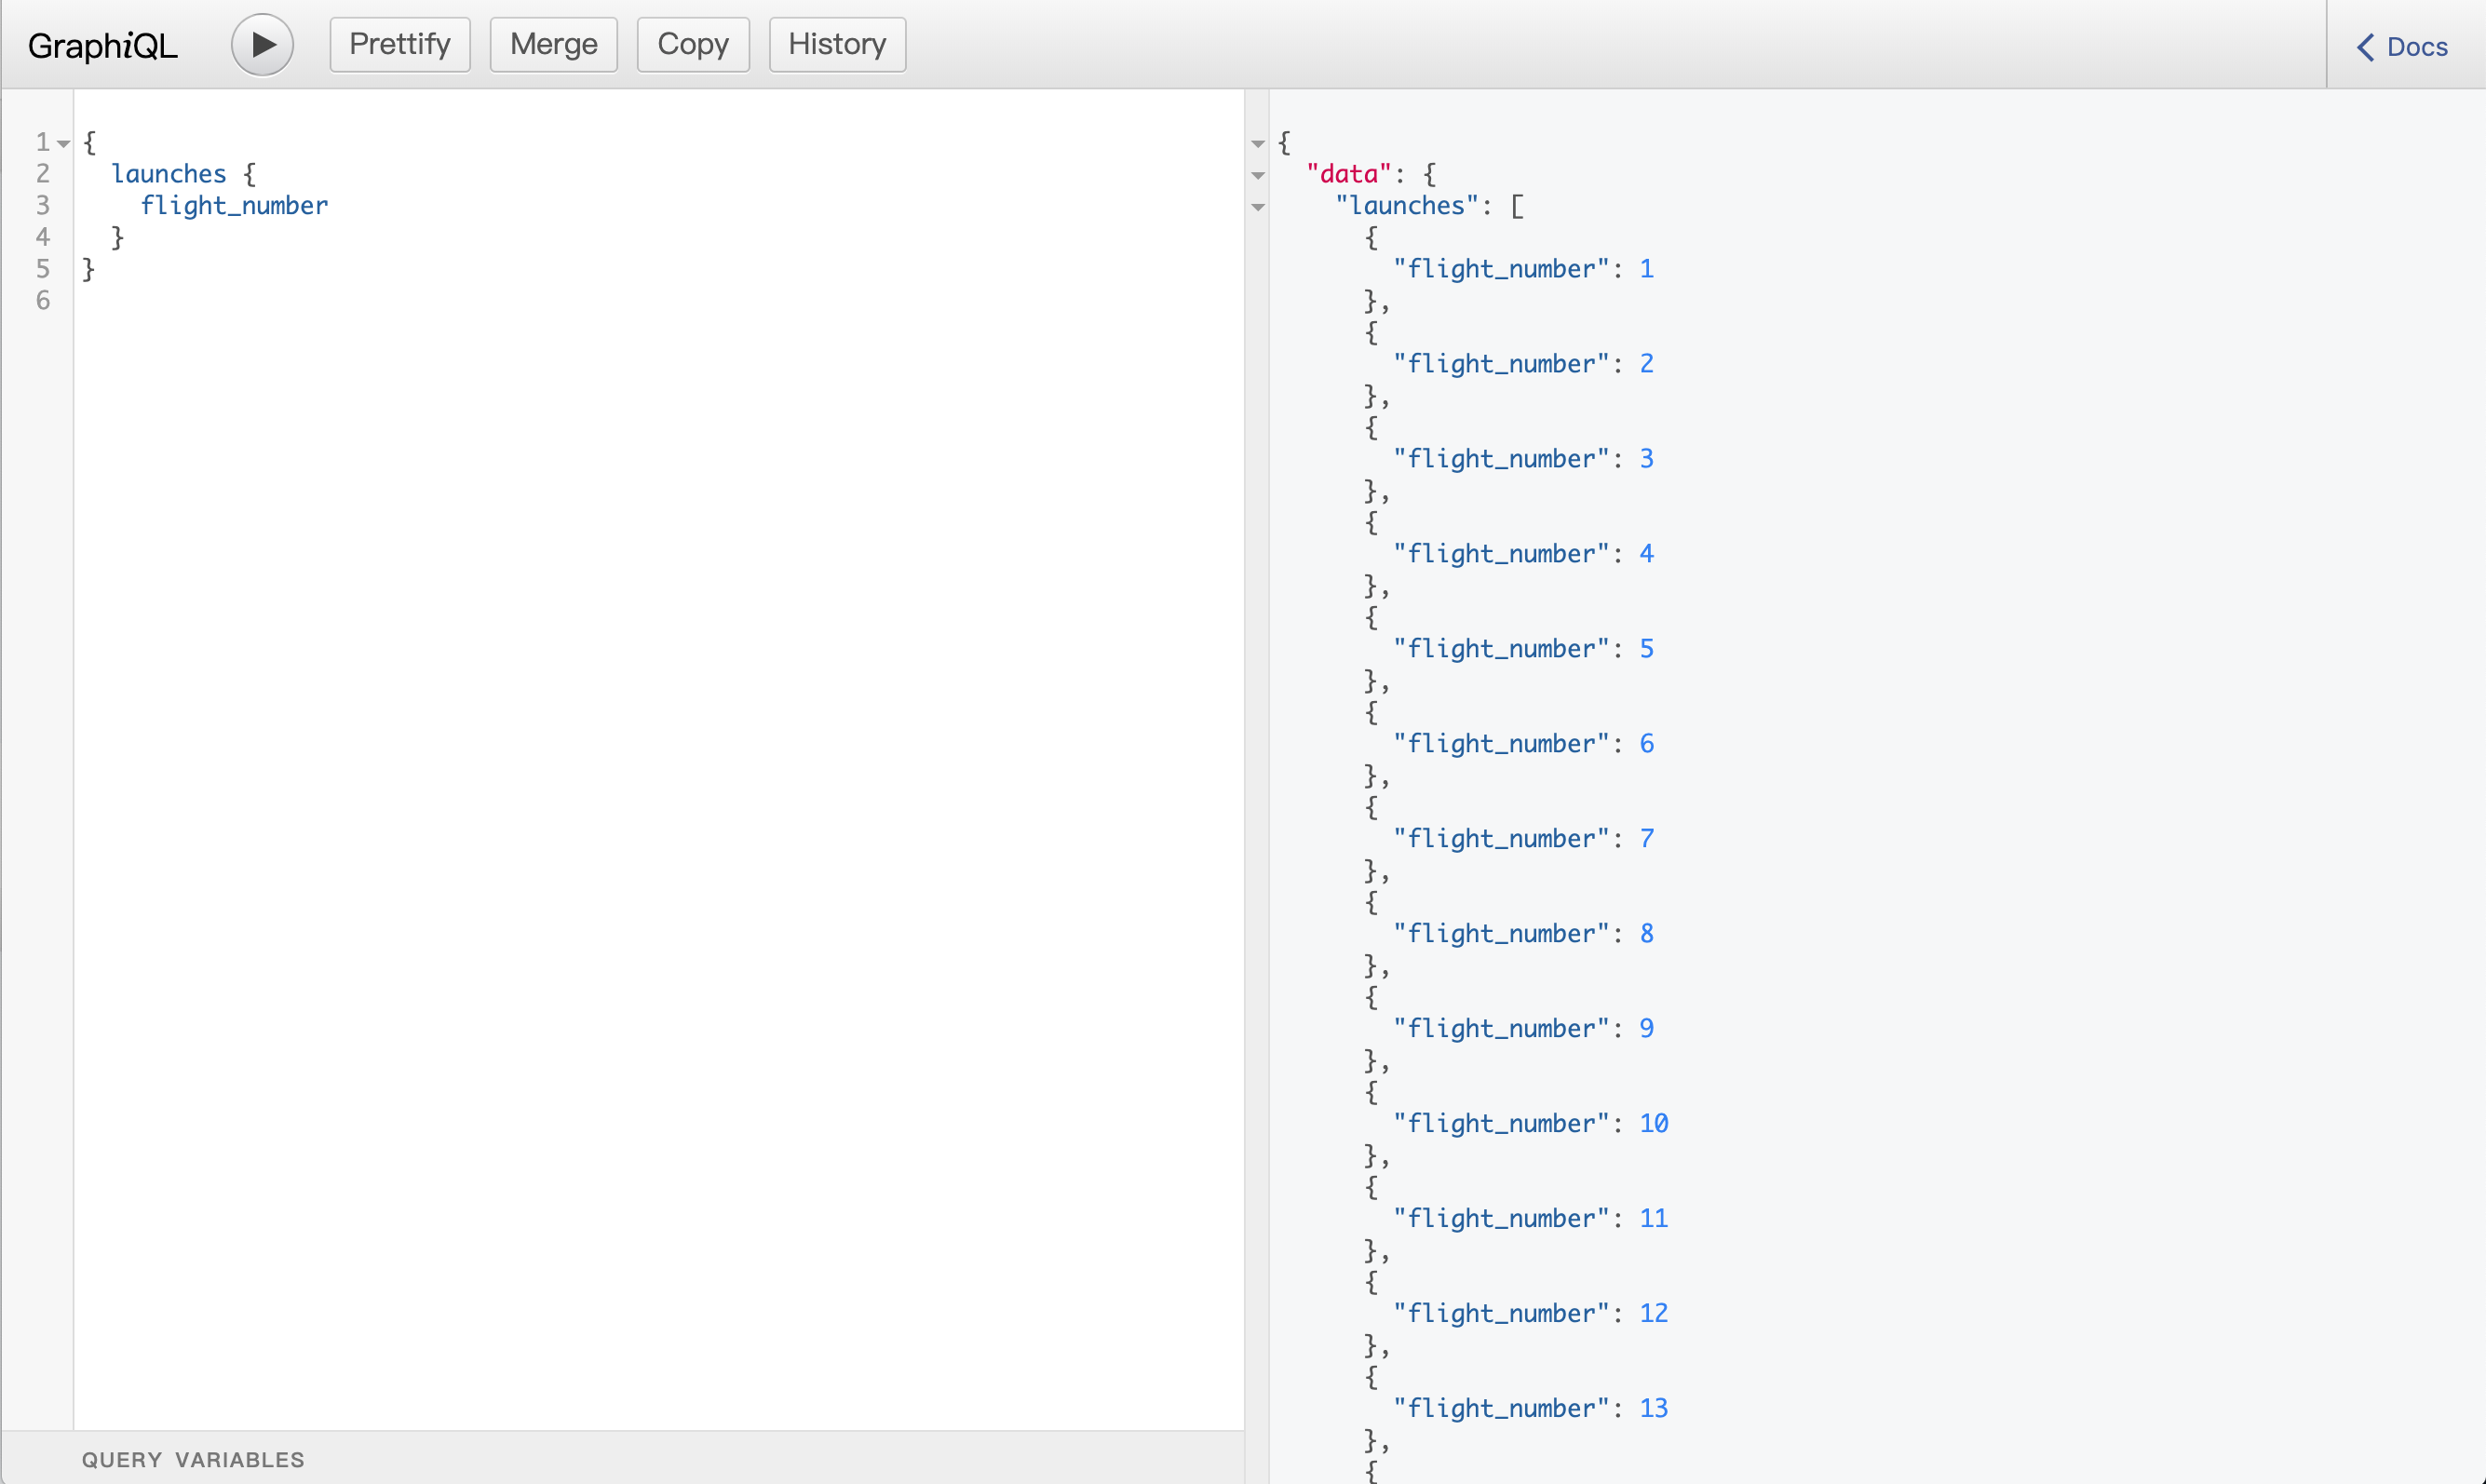
开始之前先推荐一个开放 API——美国太空探索技术公司 SpaceX 提供的开源 REST API,应有尽有的数据,详细完整的文档,还支持一键导入 Postman😏。
 ◎ 大火箭🚀
1. 使用 express-generator 搭建项目
2. 安装使用 GraphQL 需要的依赖
1
| $ npm install graphql express-graphql axios
|
此处安装 axios 是为了直接在后台发送请求获取数据,也可选择使用 Postman 中的 GraphQL 功能测试。
express-graphql 可将 Express 服务端中的 HTTP 请求使用 GraphQL 管理。
3. 管理 HTTP 请求
在app.js文件中设置路由,表示所有的客户端请求都由 GraphQL 的 requst handler 处理:
1
2
3
4
5
6
7
8
| const graphqlHTTP = require('express-graphql');
const schema = require('./schema');
app.use('/graphql', graphqlHTTP({
schema,
graphiql: true
})
);
|
graphqlHTTP()用于处理 GraphQL 的查询请求,它接收一个 options 参数,其中 schema 是一个 GraphQL Schema 实例,graphiql 设置为 true 可以在浏览器中直接对 GraphQL 进行调试。
4. Schema
Schema 是 GraphQL 的类型系统,用于参数验证和返回数据格式的设定,共有8种类型。
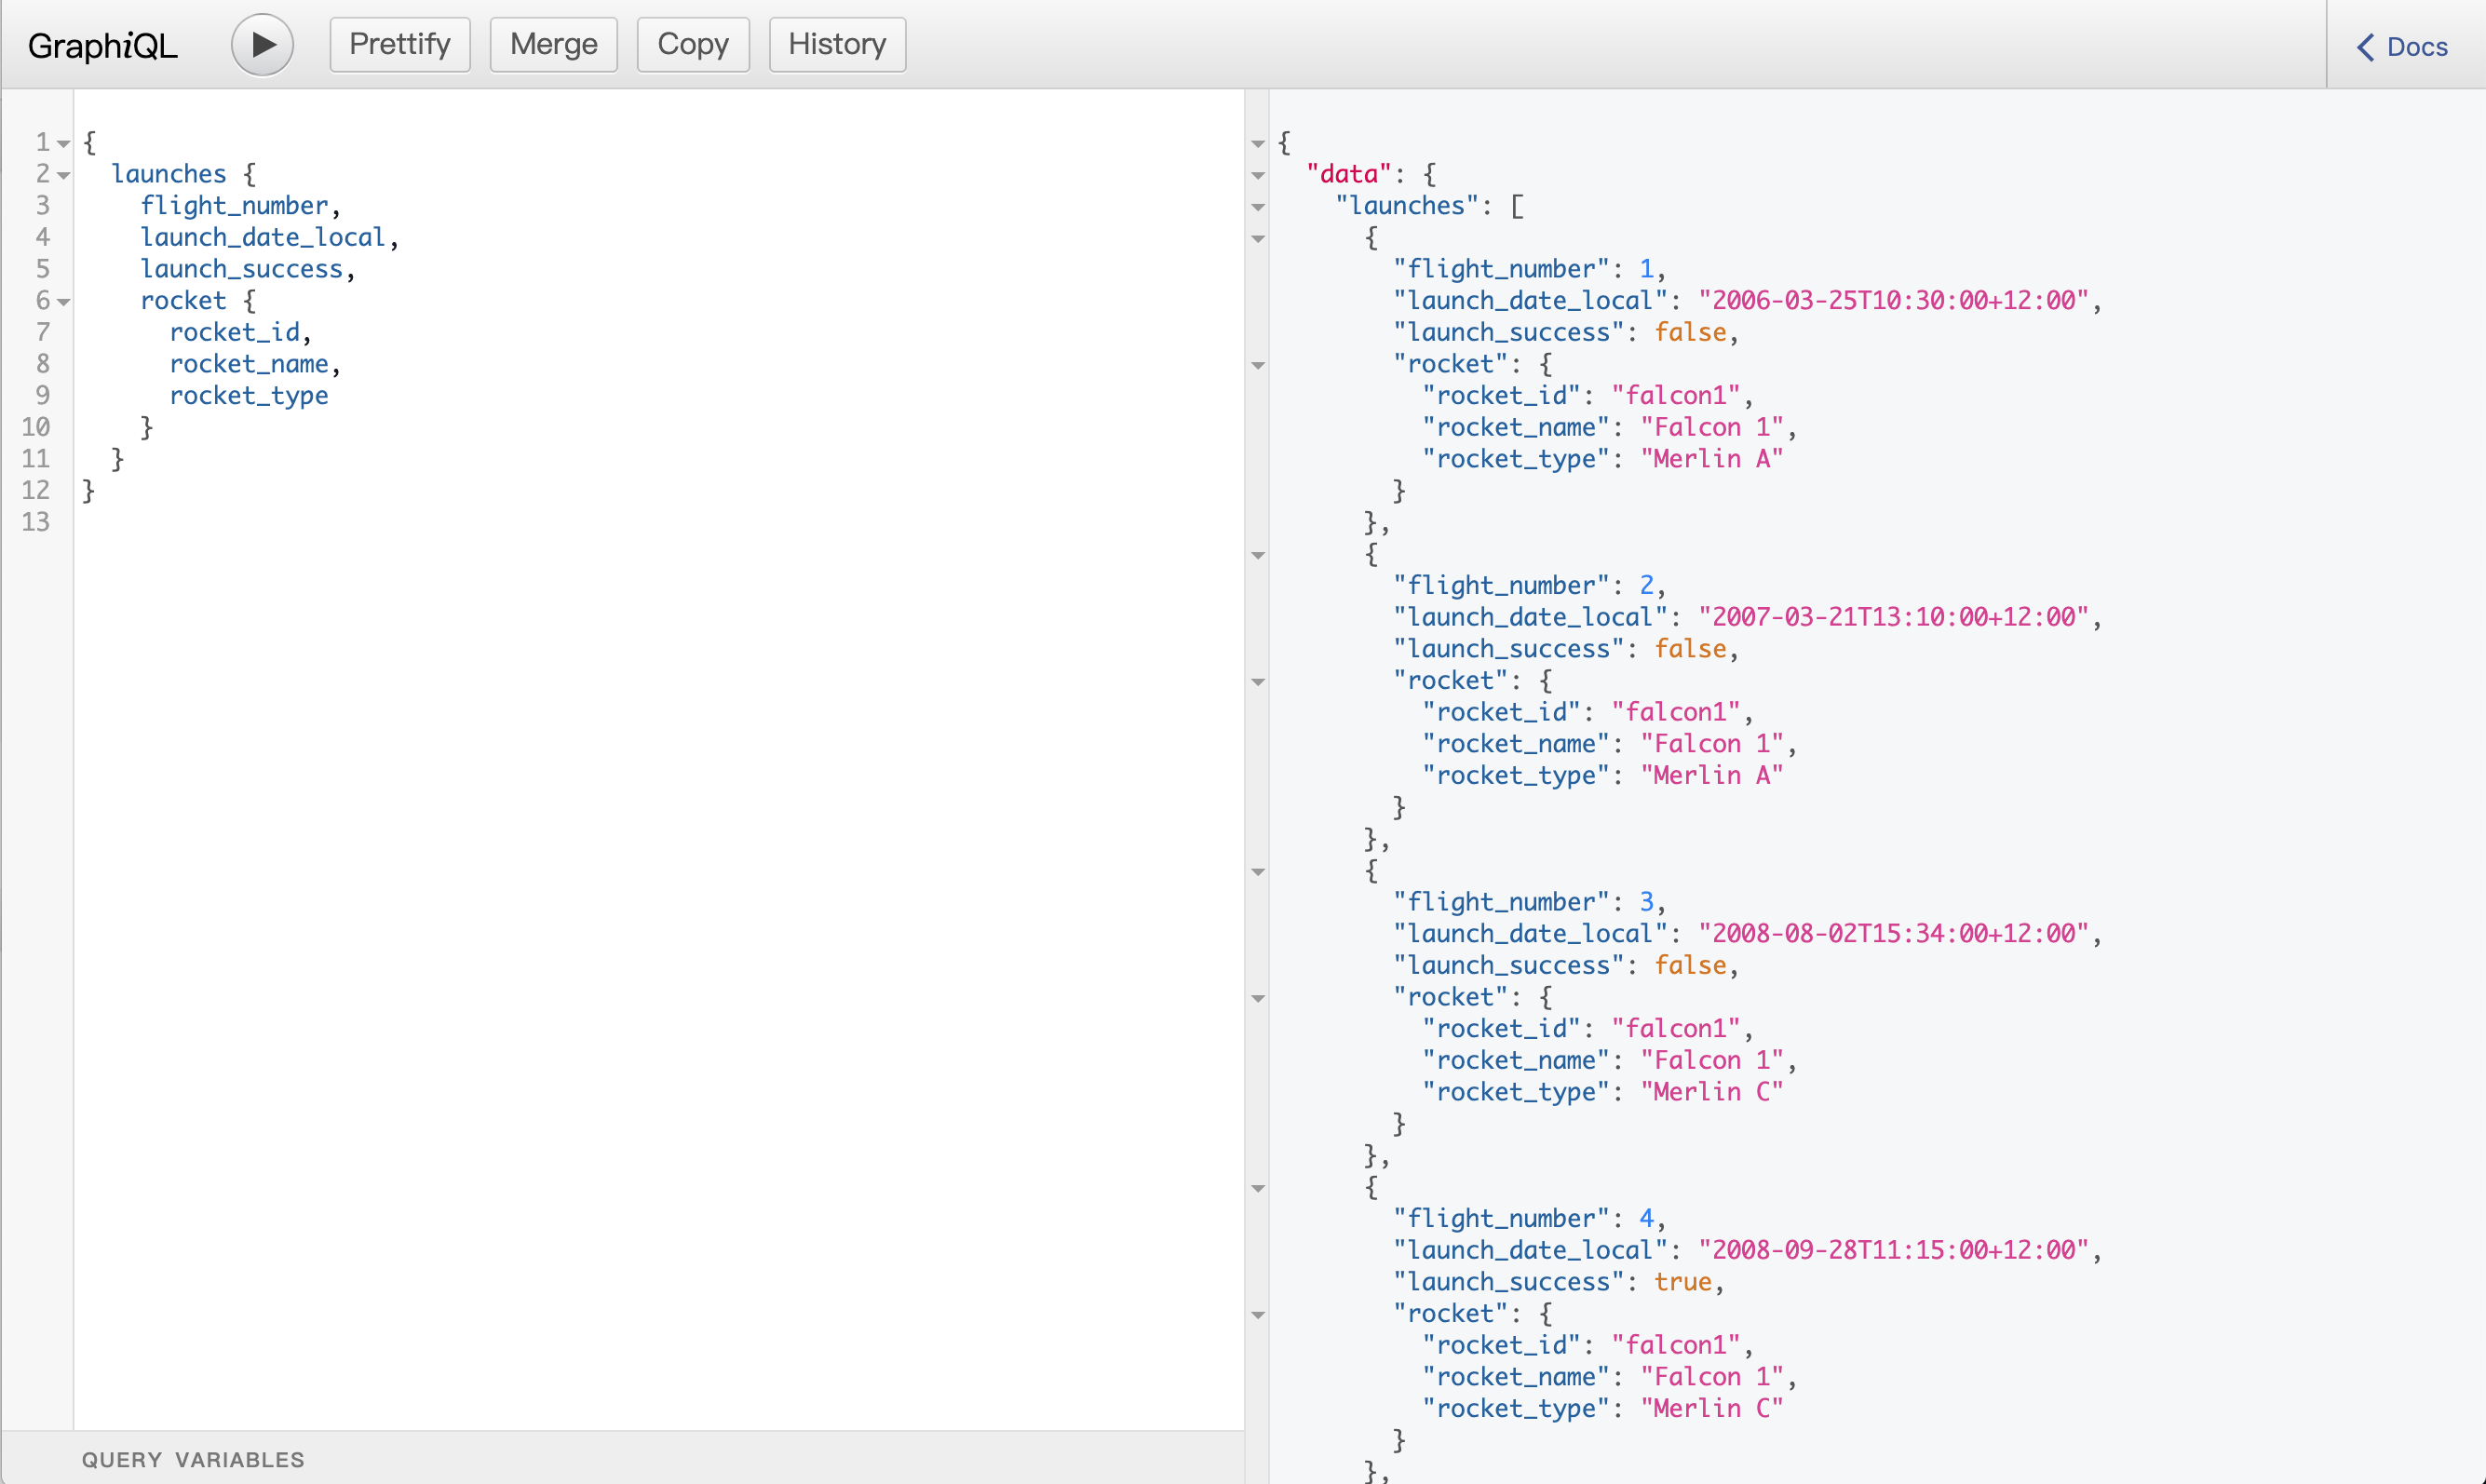
新建schema.js文件,定义两个对象类型:LaunchType 和 RocketType:
 1
 2
 3
 4
 5
 6
 7
 8
 9
10
11
12
13
14
15
16
17
18
19
20
21
22
23
| const { GraphQLObjectType, GraphQLInt, GraphQLString, GraphQLBoolean, GraphQLList, GraphQLSchema } = require('graphql');
const LaunchType = new GraphQLObjectType({
name: 'Launch',
description: '发射的相关数据💨',
fields: () => ({
flight_number: { type: GraphQLInt, description: '发射编号' },
mission_name: { type: GraphQLString, description: '任务代号' },
launch_date_local: { type: GraphQLString, description: '发射时间' },
launch_success: { type: GraphQLBoolean, description: '是否成功' },
rocket: { type: RocketType },
})
});
const RocketType = new GraphQLObjectType({
name: 'Rocket',
description: '火箭的相关数据🚀',
fields: () => ({
rocket_id: { type: GraphQLString },
rocket_name: { type: GraphQLString },
rocket_type: { type: GraphQLString }
})
});
|
5. 获取数据,定义查询入口
使用 axios 发送 HTTP 请求获取 SpaceX 官方 API 的数据,定义RootQuery作为所有查询的入口,处理并返回数据(此举实为模拟从数据库中获取数据):
 1
 2
 3
 4
 5
 6
 7
 8
 9
10
11
12
13
14
15
16
17
| const axios = require('axios');
const RootQuery = new GraphQLObjectType({
name: 'RootQueryType',
fields: {
launches: {
type: new GraphQLList(LaunchType),
resolve(parent, args) {
return axios.get('https://api.spacexdata.com/v3/launches').then(res => res.data);
}
}
}
});
module.exports = new GraphQLSchema({
query: RootQuery
});
|
6. 使用 GraphiQL 测试
项目文件夹下npm start,浏览器中输入 http://localhost:5000/graphql (端口号可在/bin目录夹下www文件中自行指定)启动 GraphiQL。
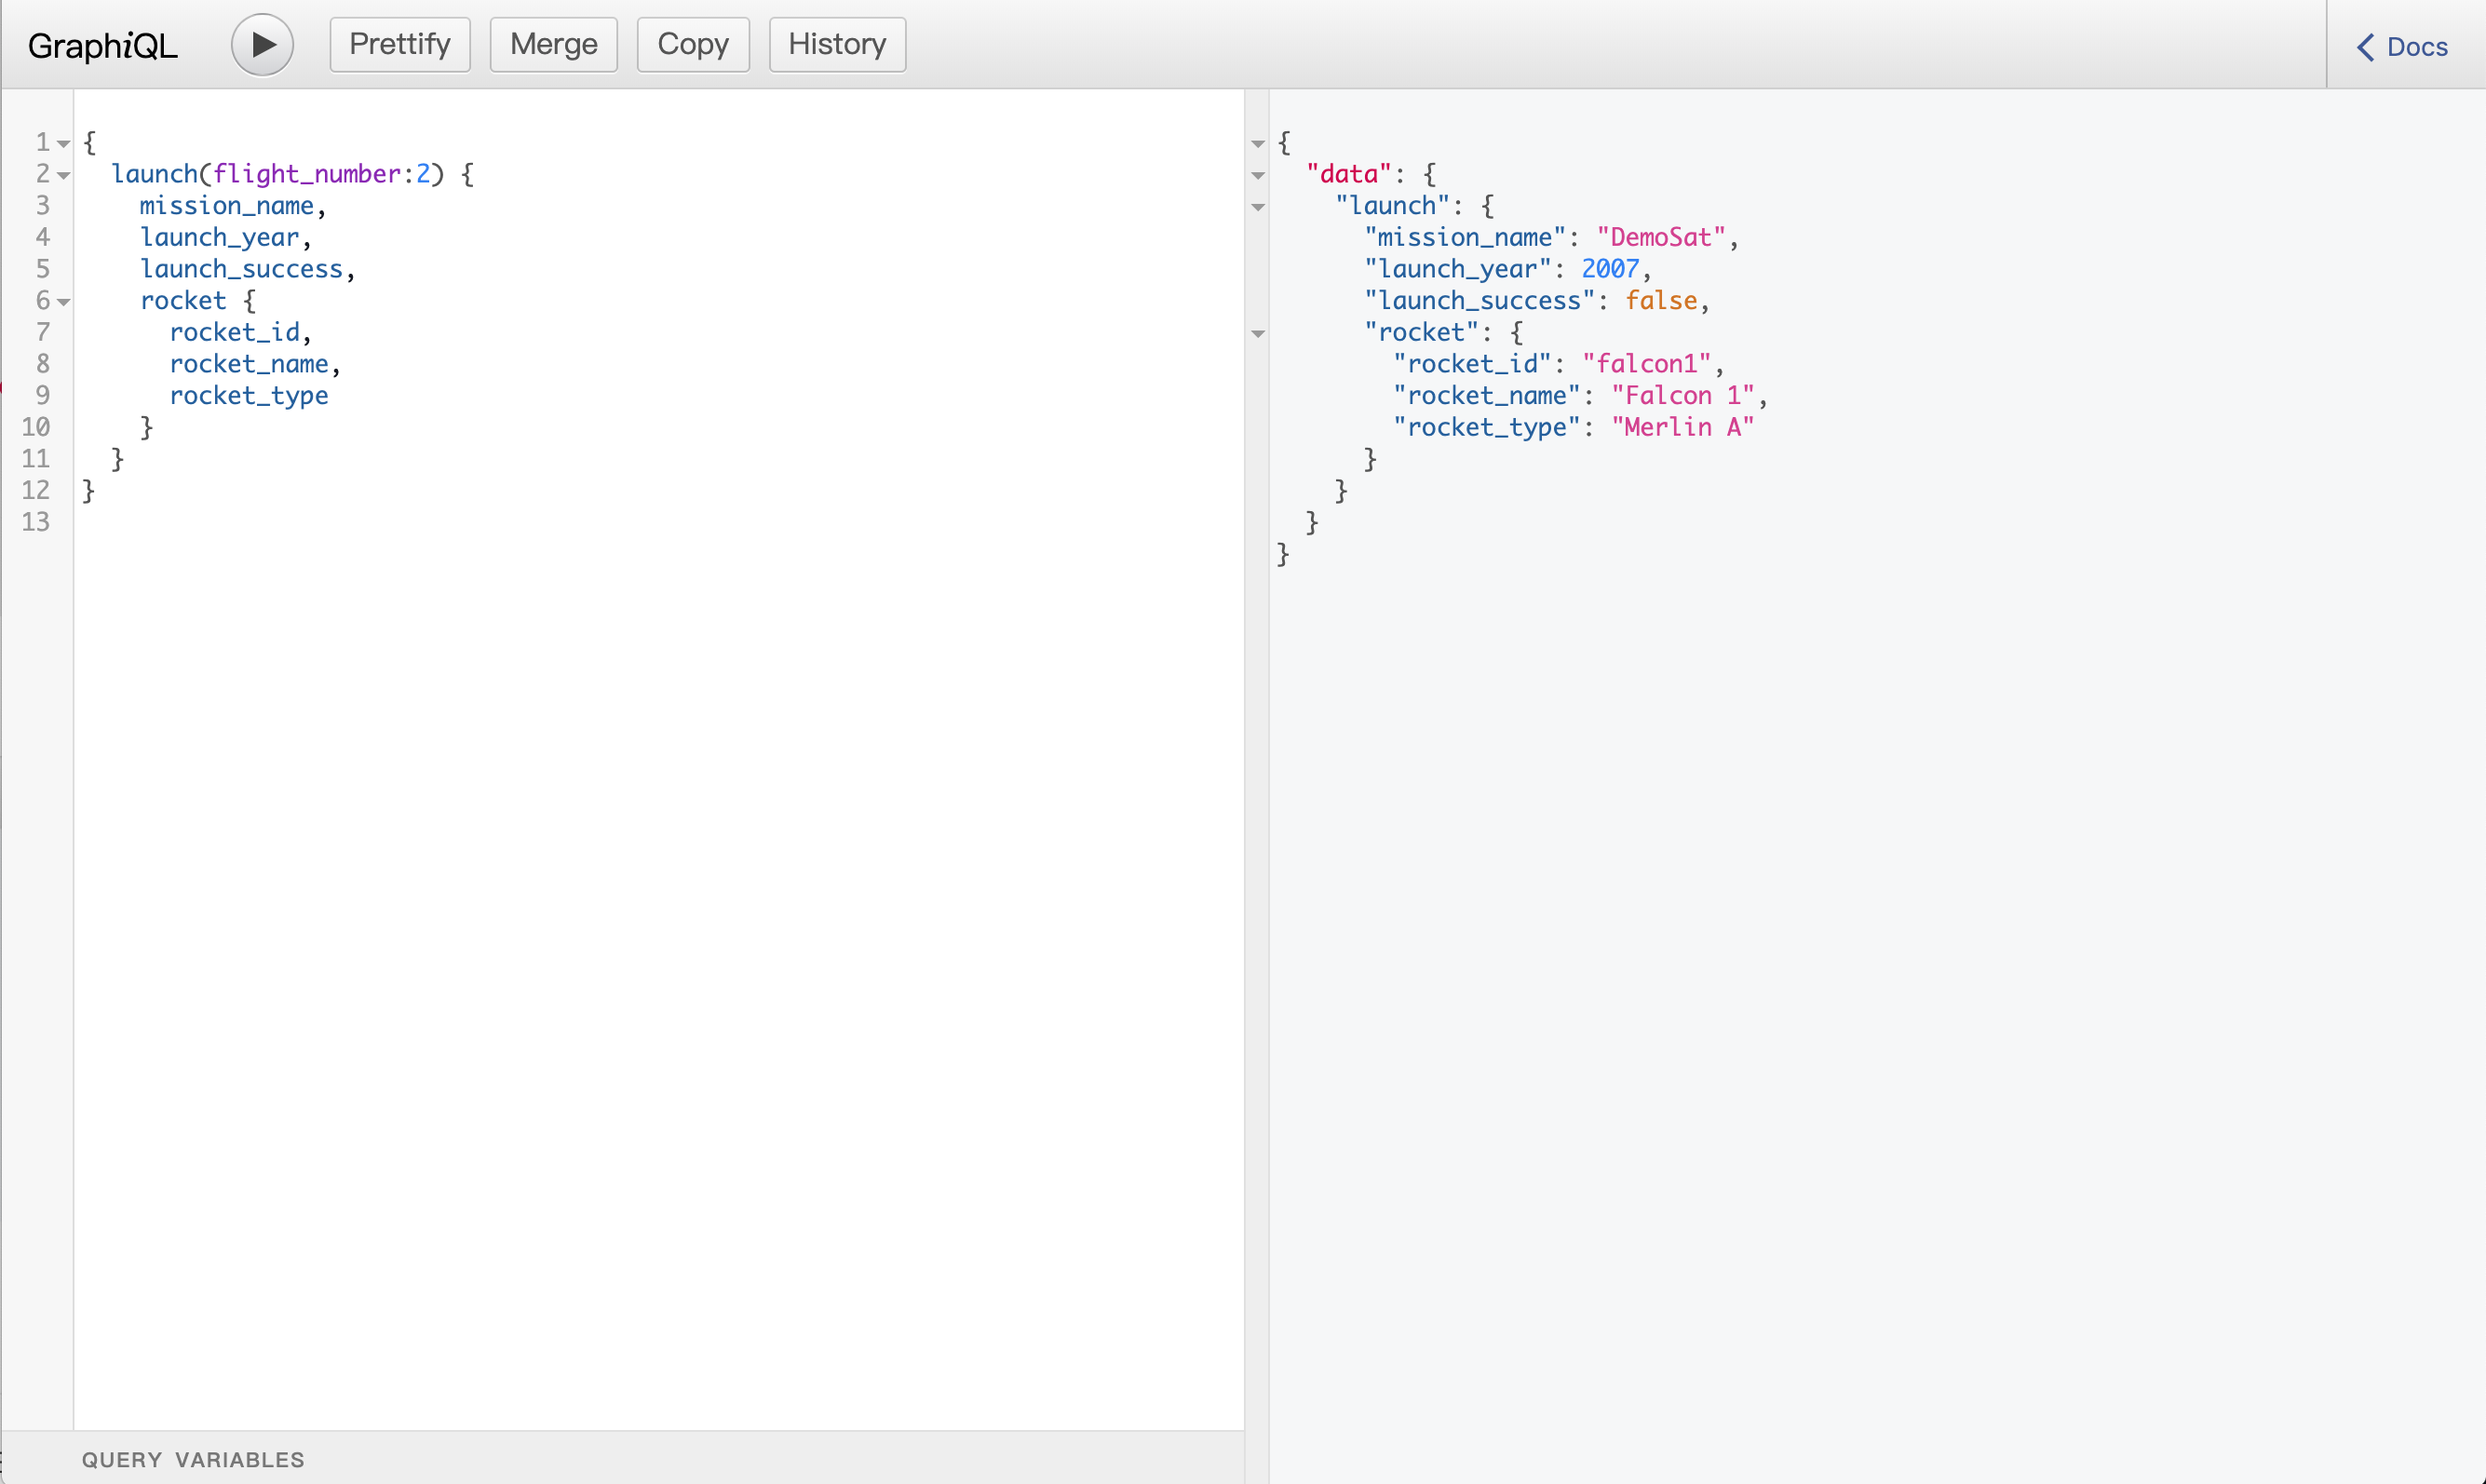
7. 指定参数实现单条数据查询
 1
 2
 3
 4
 5
 6
 7
 8
 9
10
11
12
13
14
15
16
17
18
| // schema.js
const RootQuery = new GraphQLObjectType({
name: 'RootQueryType',
fields: {
...
launch: { // 新的查询
type: LaunchType,
args: { // 添加参数
flight_number: {
type: GraphQLInt
}
},
resolve(parent, args) {
return axios.get(`https://api.spacexdata.com/v3/launches/${args.flight_number}`).then(res => res.data);
}
}
}
});
|
 ◎ GraphQL + NodeJS + MongoDB
上述实例只是验证了 GraphQL 中的强大查询可以通过 Query 轻松地实现,但还有两件事需要去做:①连接数据库使用自己的数据;②新增、更新、删除操作,下面通过一个综合实例来完成。
某些操作上方实例体验中已涉及到,此处不再赘述😑
1. 搭建项目目录
使用 express-generator 搭建项目,添加/models目录定义 MongoDB 集合的模型,添加/graphql/schema.js目录来完成 GraphQL 相关操作,最终目录结构:
.
├─ app.js
├─ bin/
│   └─ www
├─ package.json
├─ node_modules
├─ public
├─ images
├─ javascripts
├─ stylesheets/
│   └─ style.css
├─ models/
│   ├─ author.js
│   └─ book.js
├─ graphql/
│   └─ schema.js
└─ views/
    ├─ error.pug
    ├─ index.pug
    └─ layout.pug
2. 安装所需依赖项
1
| $ npm i express-graphql graphql mongoose --save
|
1. 使用 Mongoose 连接 MongoDB
 1
 2
 3
 4
 5
 6
 7
 8
 9
10
11
12
13
14
15
16
17
| // 文件位置:app.js
const mongoose = require('mongoose');
mongoose.set('useFindAndModify', false);
mongoose.connect('mongodb://127.0.0.1:27017/demo', {
useNewUrlParser: true
})
mongoose.connection.on('connected', function () {
console.log('连接成功');
})
mongoose.connection.on('error', function () {
console.log('出错');
})
mongoose.connection.on('disconnected', function () {
console.log('连接断开');
})
|
2. 定义 Mongoose 数据模型
 1
 2
 3
 4
 5
 6
 7
 8
 9
10
| // 文件位置:models/author.js
const mongoose = require('mongoose');
const Schema = mongoose.Schema;
const authorSchema = new Schema({
"name": String,
"age": Number
});
module.exports = mongoose.model("Author", authorSchema, 'authors');
|
 1
 2
 3
 4
 5
 6
 7
 8
 9
10
11
| // 文件位置:models/book.js
const mongoose = require('mongoose');
const Schema = mongoose.Schema;
const bookSchema = new Schema({
"name": String,
"page": Number,
"authorId": { type: mongoose.Types.ObjectId }
});
module.exports = mongoose.model("Book", bookSchema, 'books');
|
Express 中传统的 RESTful 接口使用express-router来管理路由,并在不同路由中完成相应的数据库操作,而要结合 GraphQL 就不能使用这种方式了,需要使用 GraphQL 中的方法管理所有的 HTTP 请求,然后在 GraphQL 的接口中完成相应的数据库操作。
1. 定义请求入口,使用 GraphQL 管理所有的 HTTP 请求
2. 定义对象类型和字段
此处的 Schema 才真正决定请求返回的是怎样的数据结构,与 Mongoose 的 Schema 完全不同,后者实际只是为了定义 Model 完成数据库操作,比如author集合中本没有books字段,而在 GraphQL 的对象类型中定义以后客户端就可以拿到定义的相应数据。
 1
 2
 3
 4
 5
 6
 7
 8
 9
10
11
12
13
14
15
16
17
18
19
20
21
22
23
24
25
26
27
28
29
30
31
32
33
34
35
36
37
38
39
40
41
42
43
44
45
46
47
48
49
50
51
52
53
54
55
56
57
58
59
60
61
62
63
64
65
66
67
68
69
70
71
72
73
74
75
76
77
78
79
80
81
82
| // 文件位置:graphql/schema.js
const graphql = require('graphql');
const Author = require('../models/author'); // 引入作者模型
const Book = require('../models/book'); // 引入书籍模型
const { // 定义GrapQL中Schema的类型
GraphQLObjectType,
GraphQLString,
GraphQLID,
GraphQLInt,
GraphQLSchema,
GraphQLList,
GraphQLNonNull
} = graphql;
// 定义Book的Schema,决定了其可以返回的数据包括哪些
const BookType = new GraphQLObjectType({
name: 'Book',
description: "书籍信息",
fields: () => ({
id: {
type: GraphQLID,
name: "id"
},
// _id: {
// type: GraphQLID,
// name: "也是id吗?"
// },
name: {
type: GraphQLString,
name: "书名", // 此处的name用于在GraphiQL Query栏输入字段时显示
description: "书名" // 此处的description用于在GraphiQL Docs中显示
},
page: {
type: GraphQLInt,
name: '页数',
description: '页数'
},
author: {
type: AuthorType,
name: '书的作者',
description: '书的作者',
resolve(parent, args) {
return Author.findById(parent.authorId);
}
}
})
})
// 定义Author的Schema
const AuthorType = new GraphQLObjectType({
name: 'Author',
description: "作者信息",
fields: () => ({
id: {
type: GraphQLID
},
name: {
type: GraphQLString,
name: '作者名',
description: '作者名'
},
age: {
type: GraphQLInt,
name: '作者年龄',
description: '作者年龄'
},
books: {
type: new GraphQLList(BookType),
name: '著作',
description: '著作',
resolve(parent, args) {
return Book.find({
authorId: parent.id
});
}
}
})
})
|
字段的name属性和description属性可设置在 GraphiQL 的 Query 栏中输入字段时或在 Docs 中显示对应的说明
resove()方法才是掌控返回具体数据的关键,如果不设置则根据字段名对应,BookType的author字段和AuthorType的books字段都是通过resove()进行了数据的关联,常用参数:
parent:上一级对象,如 author 字段resove()中的parent为 Book,parent.authorId即为 book 集合中的authorId字段args:请求的参数,通常在 Query 和 Mutation 操作中使用
3. 定义具体接口,完成数据库操作
GraphQL 中的 Mutation 操作用于对数据进行新增、更改和删除操作,用法与 Query 类似。
 1
 2
 3
 4
 5
 6
 7
 8
 9
10
11
12
13
14
15
16
17
18
19
20
21
22
23
24
25
26
27
28
29
30
31
32
33
34
35
36
37
38
39
40
41
42
43
44
45
46
47
48
49
50
51
52
53
54
55
56
57
58
59
60
61
62
63
64
65
66
67
68
69
70
71
72
73
74
75
76
77
78
79
80
81
82
83
84
85
86
87
88
89
| const RootQuery = new GraphQLObjectType({ // 相当于js中定义了一个对象,然后在对象中添加各种方法
name: 'RootQueryType',
fields: {
books: {
type: new GraphQLList(BookType),
description: '获取所有的书籍信息', // 此处的description用于在GraphiQL Query中显示
resolve() {
return Book.find({});
}
},
book: {
type: BookType,
description: '根据书名获取书籍信息',
args: { // 定义参数
name: {
type: GraphQLString
}
},
resolve(parent, args) {
return Book.findOne({
name: args.name
});
}
},
author:{
type: AuthorType,
description: "根据作者id获取作者信息",
args: { id: { type: GraphQLID } },
resolve(parent, args) {
return Author.findById(args.id);
}
},
authors:{
type: new GraphQLList(AuthorType),
description: "获取所有作者信息",
resolve(parent, args) {
return Author.find({});
}
}
}
})
const Mutation = new GraphQLObjectType({
name: 'Mutation',
fields: {
addAuthor: {
type: AuthorType,
args: {
name: { type: new GraphQLNonNull(GraphQLString) }, //GraphQLNonNull作用与Mongoose Schema中的required类似,设置参数为必须值
age: { type: new GraphQLNonNull(GraphQLInt) }
},
resolve(parent, args){
let author = new Author({
name: args.name,
age: args.age
})
return author.save();
}
},
updateAuthor: {
type: AuthorType,
args: {
name: { type: new GraphQLNonNull(GraphQLString) },
age: { type: new GraphQLNonNull(GraphQLInt) }
},
resolve(parent, args){
let updateObj = {
name: args.name,
age: args.age
}
return Author.findOneAndUpdate({ name: args.name }, updateObj);
}
},
deleteBook: {
type: BookType,
args: {
name: { type: GraphQLString }
},
resolve(parent, args){
return Book.deleteOne({ name: args.name });
}
}
}
})
module.exports = new GraphQLSchema({
query: RootQuery,
mutation: Mutation
});
|
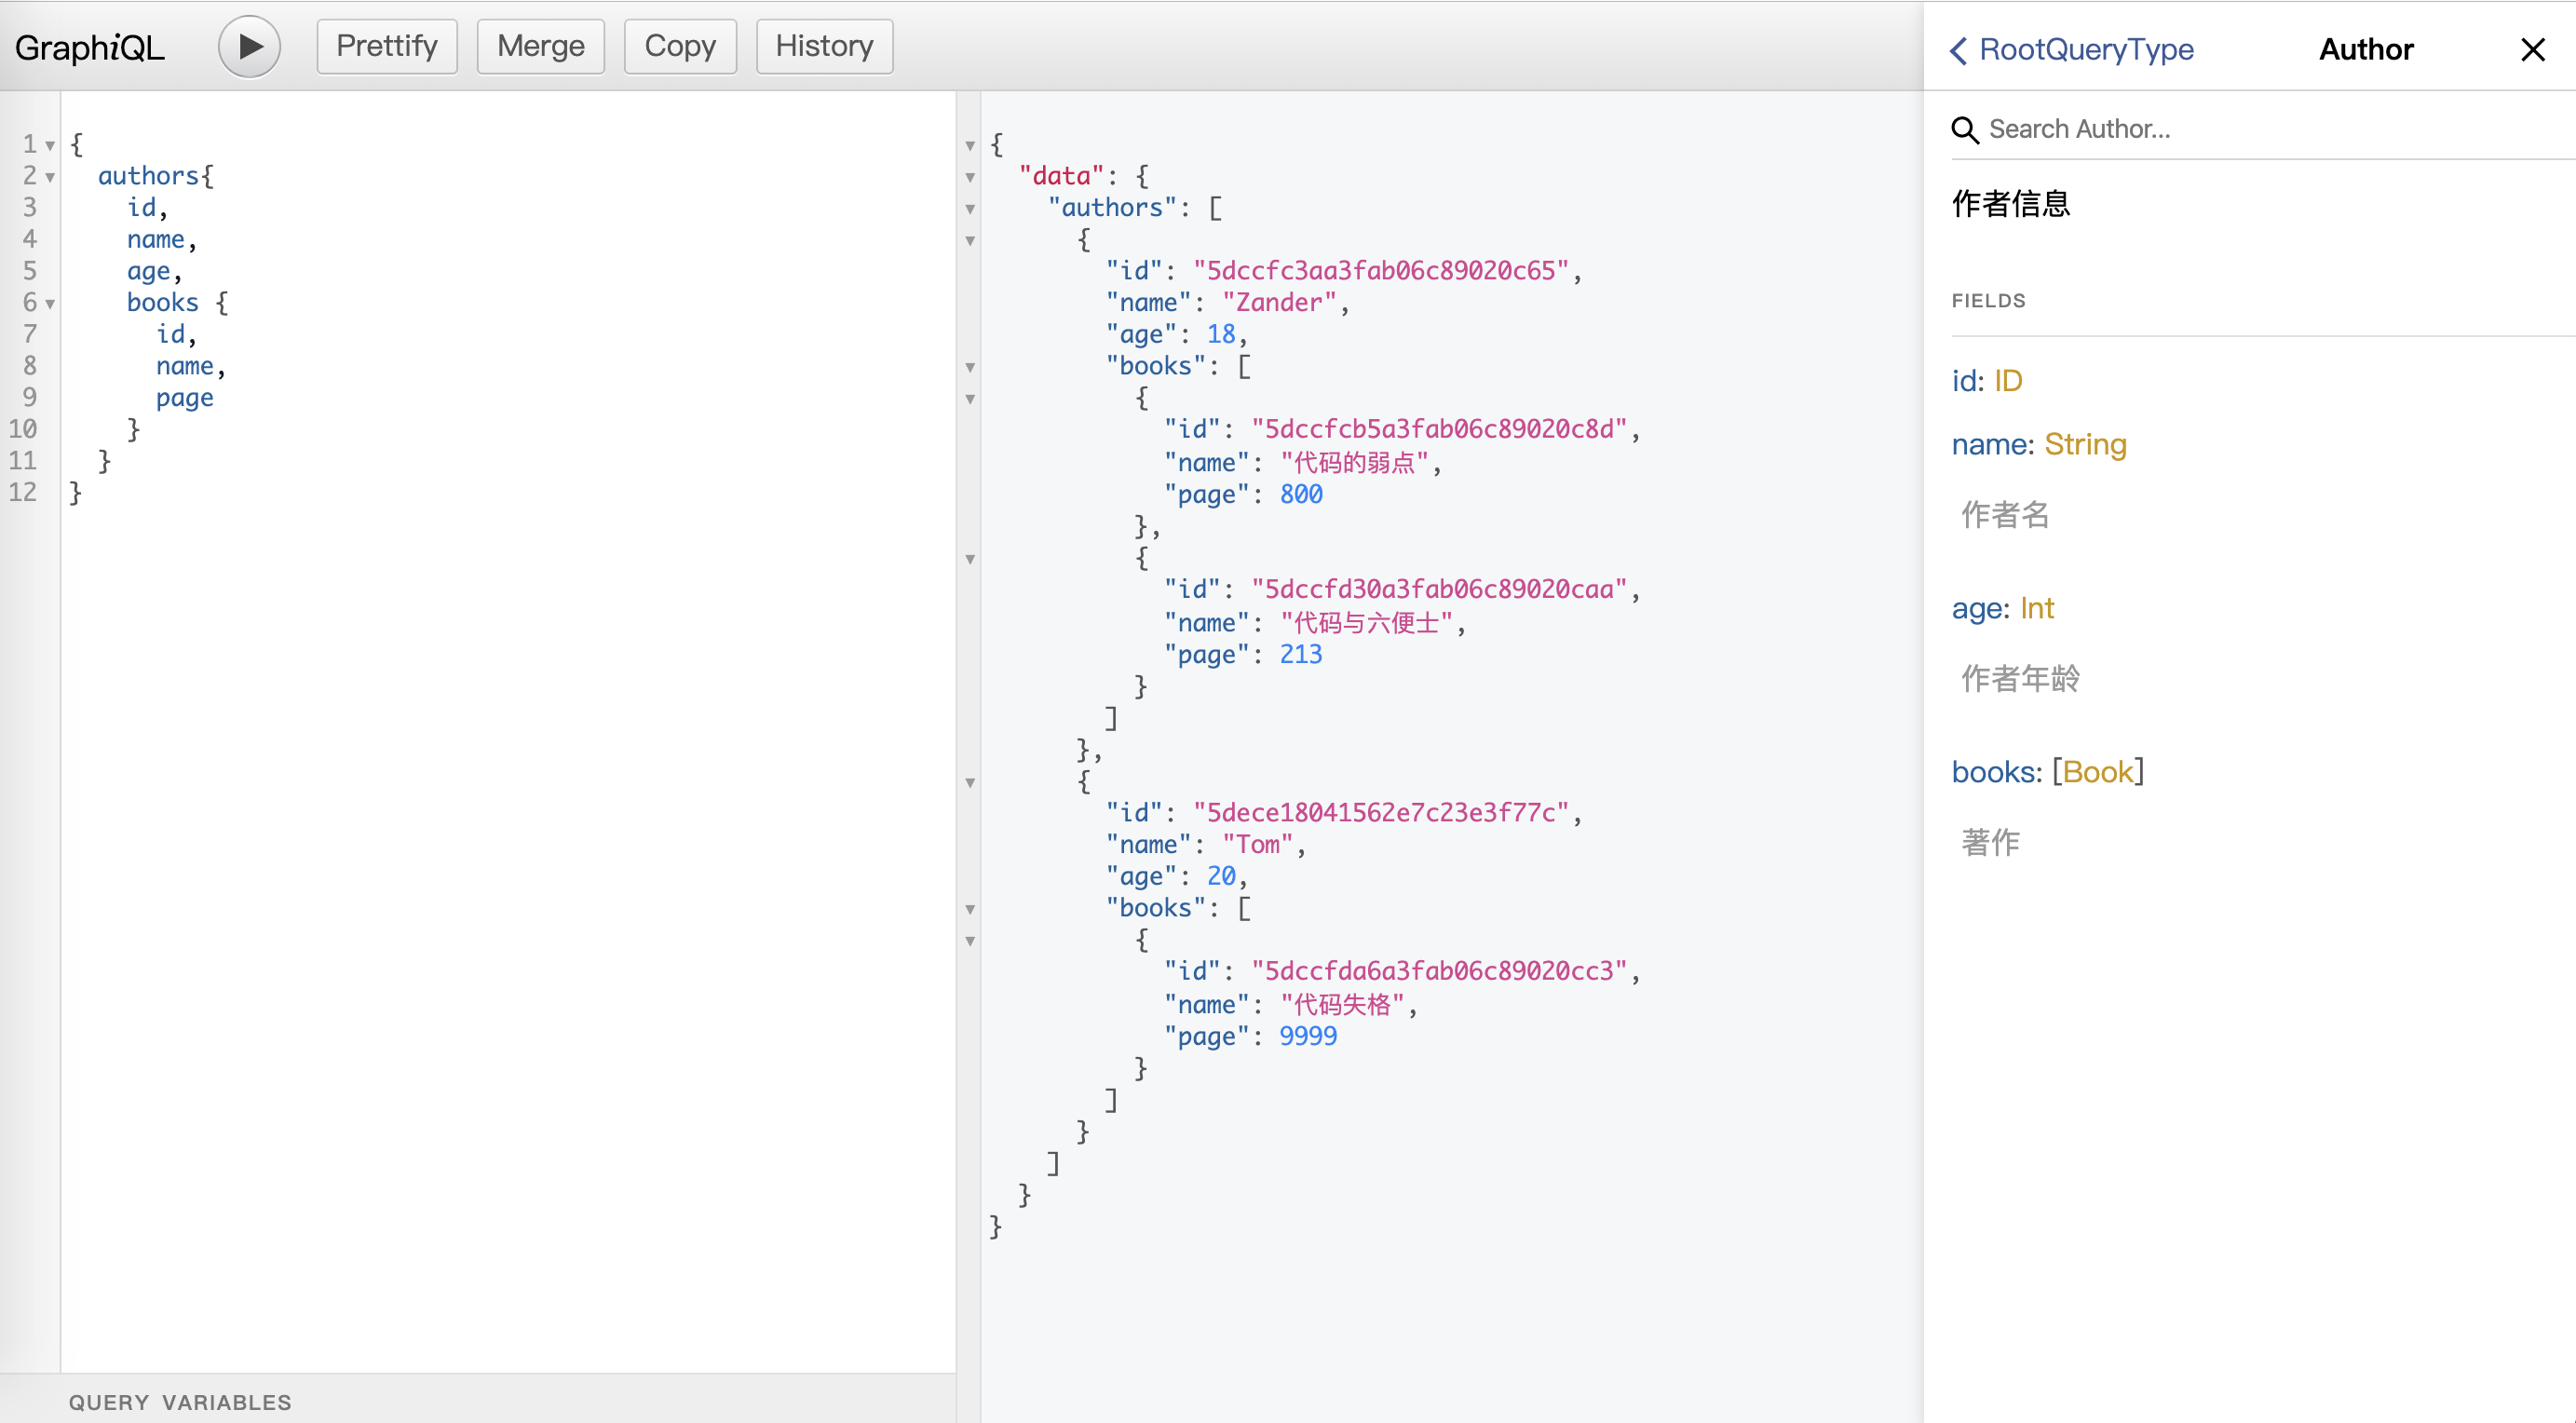
查询所有作者信息:
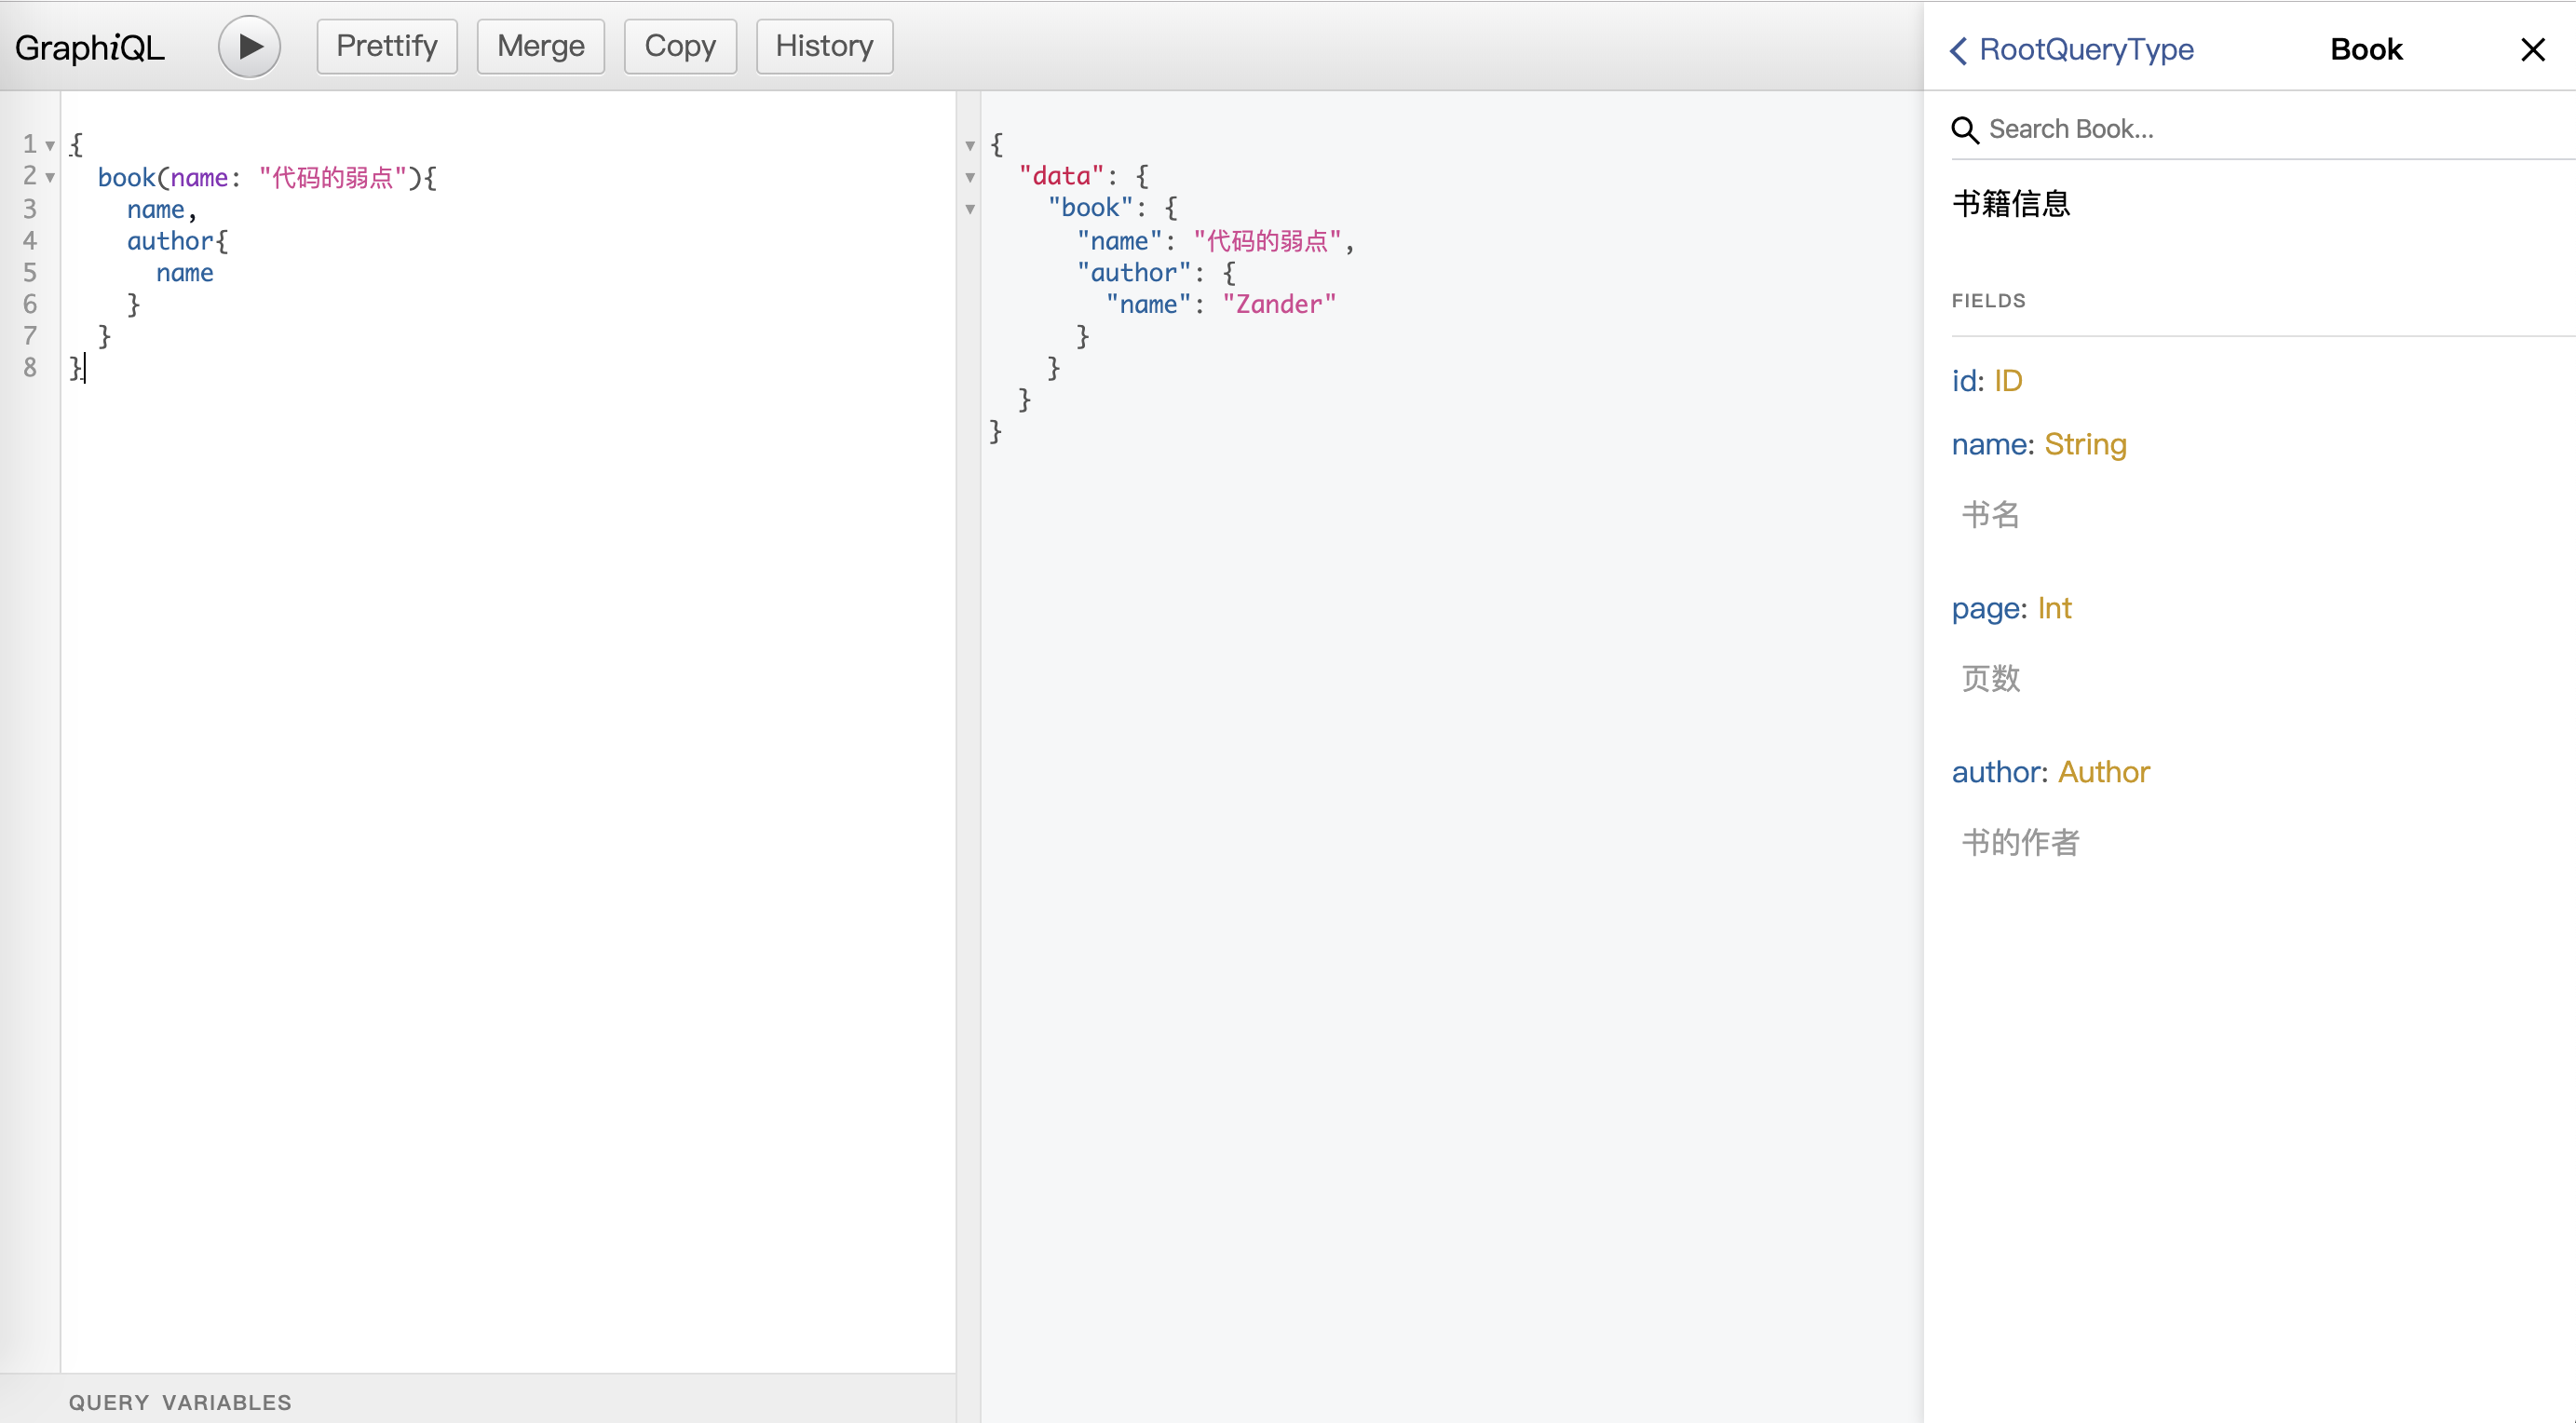
根据书籍名查找书籍信息:
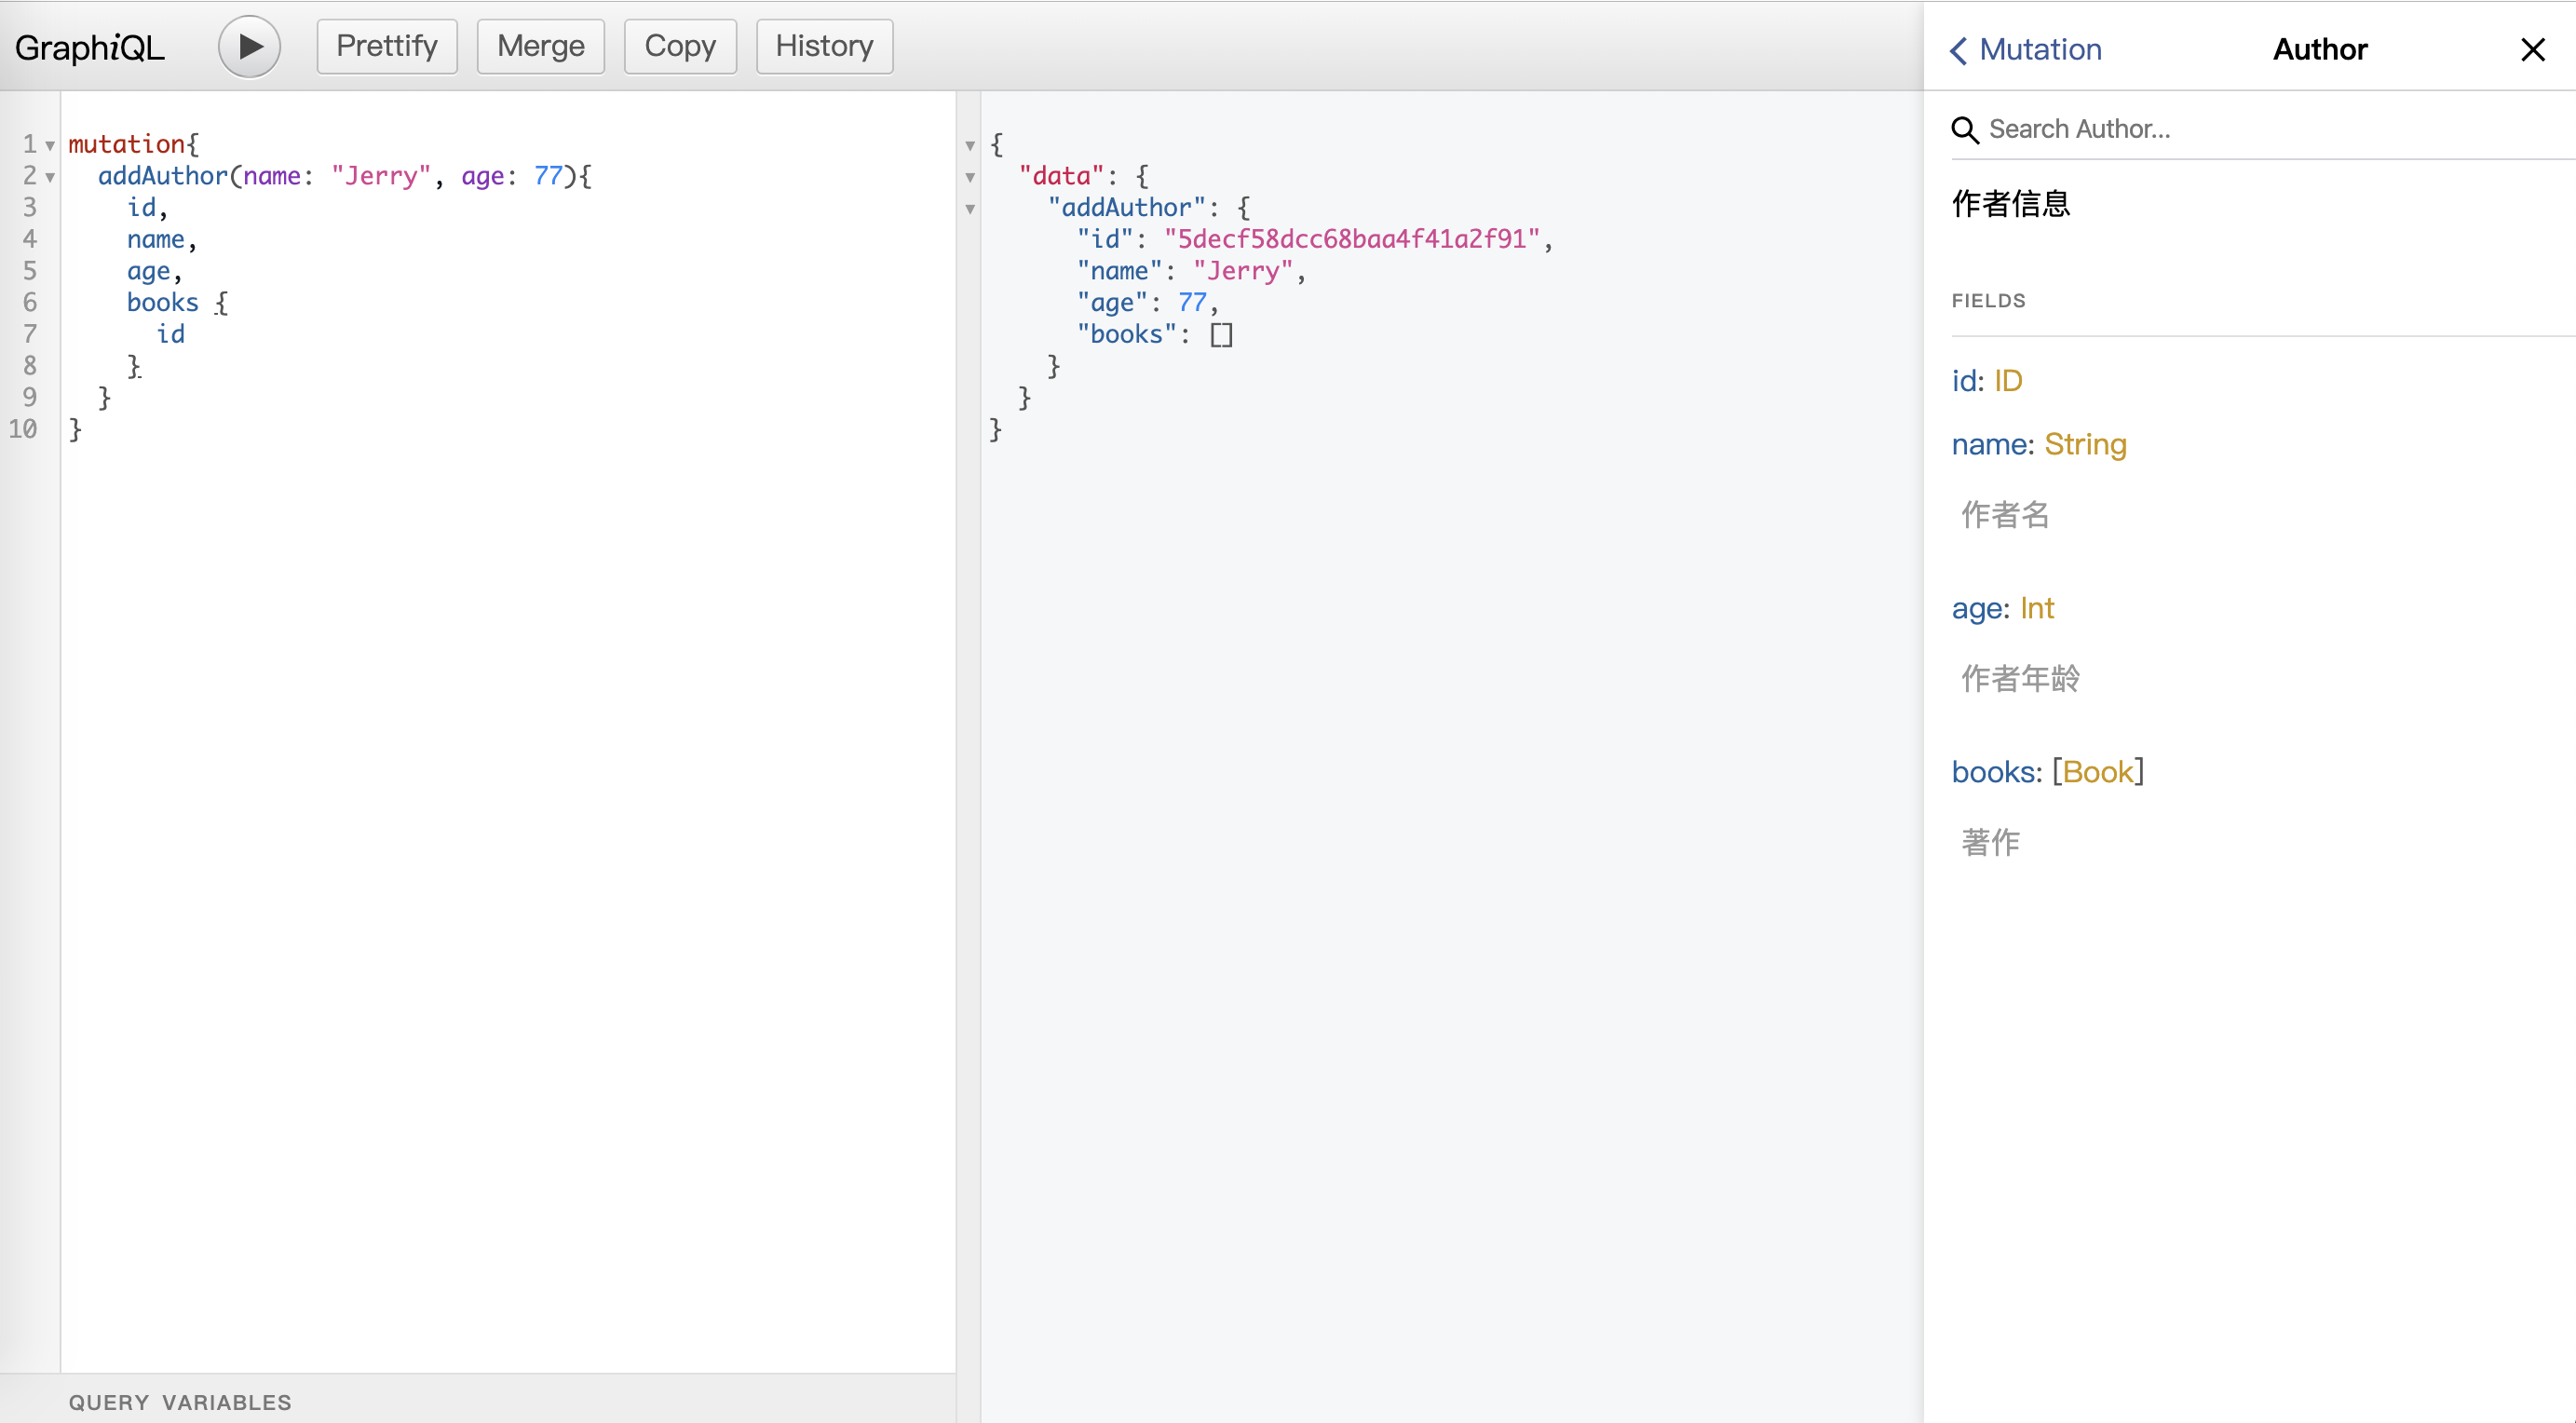
新增作者:
更新作者信息:
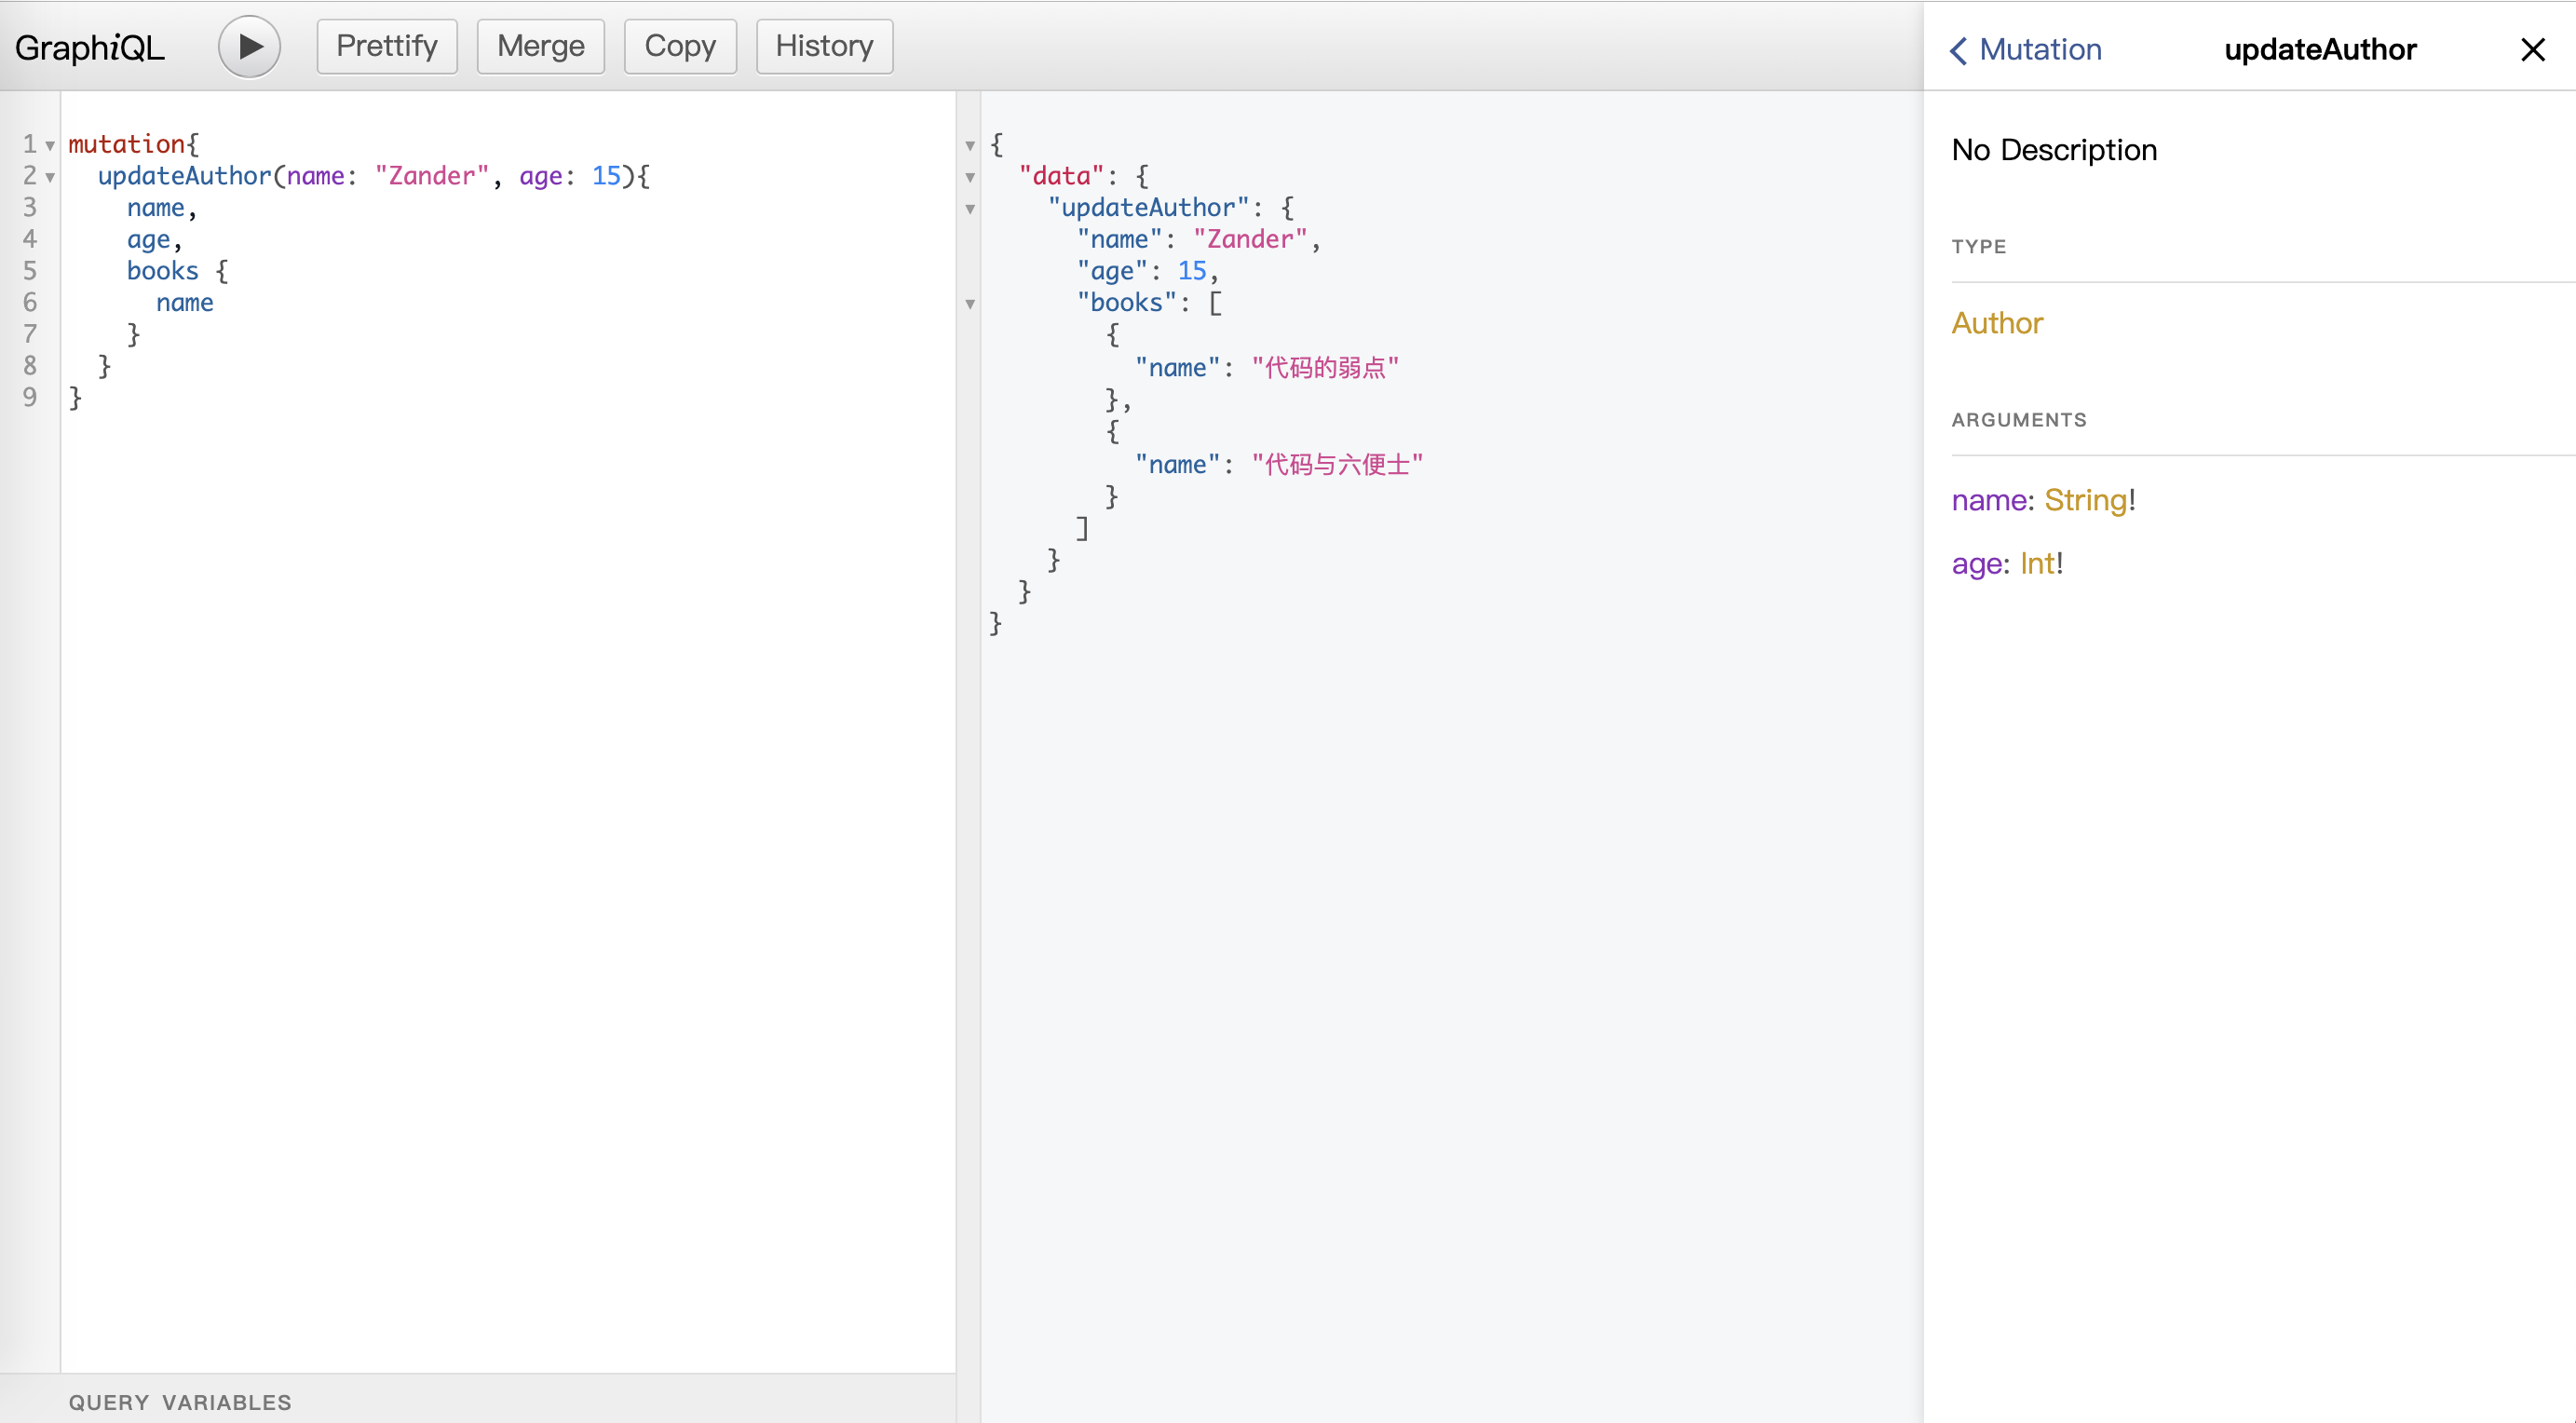
删除作者:

不知你是否发现了惊奇的一点:Mongoose 定义的authorSchema中并没有书籍相关的字段,所有操作数据库的方法中也没有用到populate及aggregate关联数据,但是上方「查询所有作者信息」的接口authors返回了书籍的所有信息。
没错,这就是 GraphQL 优越所在——在 Type 中自由地定义返回的数据(AuthorType的books字段)。但是问题也随之来了,这类简单的关联查询实际会导致严重的 N + 1查询性能问题。
一旦你学习完 GraphQL 的基础知识就大概率会看到大家在谈论 N + 1问题,N + 1是什么呢?为了理解起来更简单,我新建了 persons 和 friends 集合,其数据结构如下:
persons 数据:
 1
 2
 3
 4
 5
 6
 7
 8
 9
10
| {
"_id" : ObjectId("5df49a5856652a298949e313"),
"name" : "Zander",
"age" : 18,
"alive" : true,
"friends" : [
ObjectId("5df49a7556652a298949e31d"),
ObjectId("5df49aa256652a298949e331")
]
}
|
friends 数据:
 1
 2
 3
 4
 5
 6
 7
 8
 9
10
11
12
| {
"_id" : ObjectId("5df49a7556652a298949e31d"),
"name" : "Tom",
"tel" : "120",
"email" : "tom@gmail.com"
}
{
"_id" : ObjectId("5df49aa256652a298949e331"),
"name" : "Jerry",
"tel" : "110",
"email" : "jerry@gmail.com"
}
|
接下来是同样的步骤——新建 personType 和 friendType,再建立简单的 personQuery:
 1
 2
 3
 4
 5
 6
 7
 8
 9
10
11
12
13
14
15
16
| const personQuery = new GraphQLObjectType({
name: 'personQueryType',
description: '查询人物信息',
fields: {
person: {
type: personType,
description: '获取人物及朋友信息',
args: {
name: {type: GraphQLString}
},
resolve: (parent, arg) => {
return Person.findOne({name: arg.name});
}
}
}
})
|
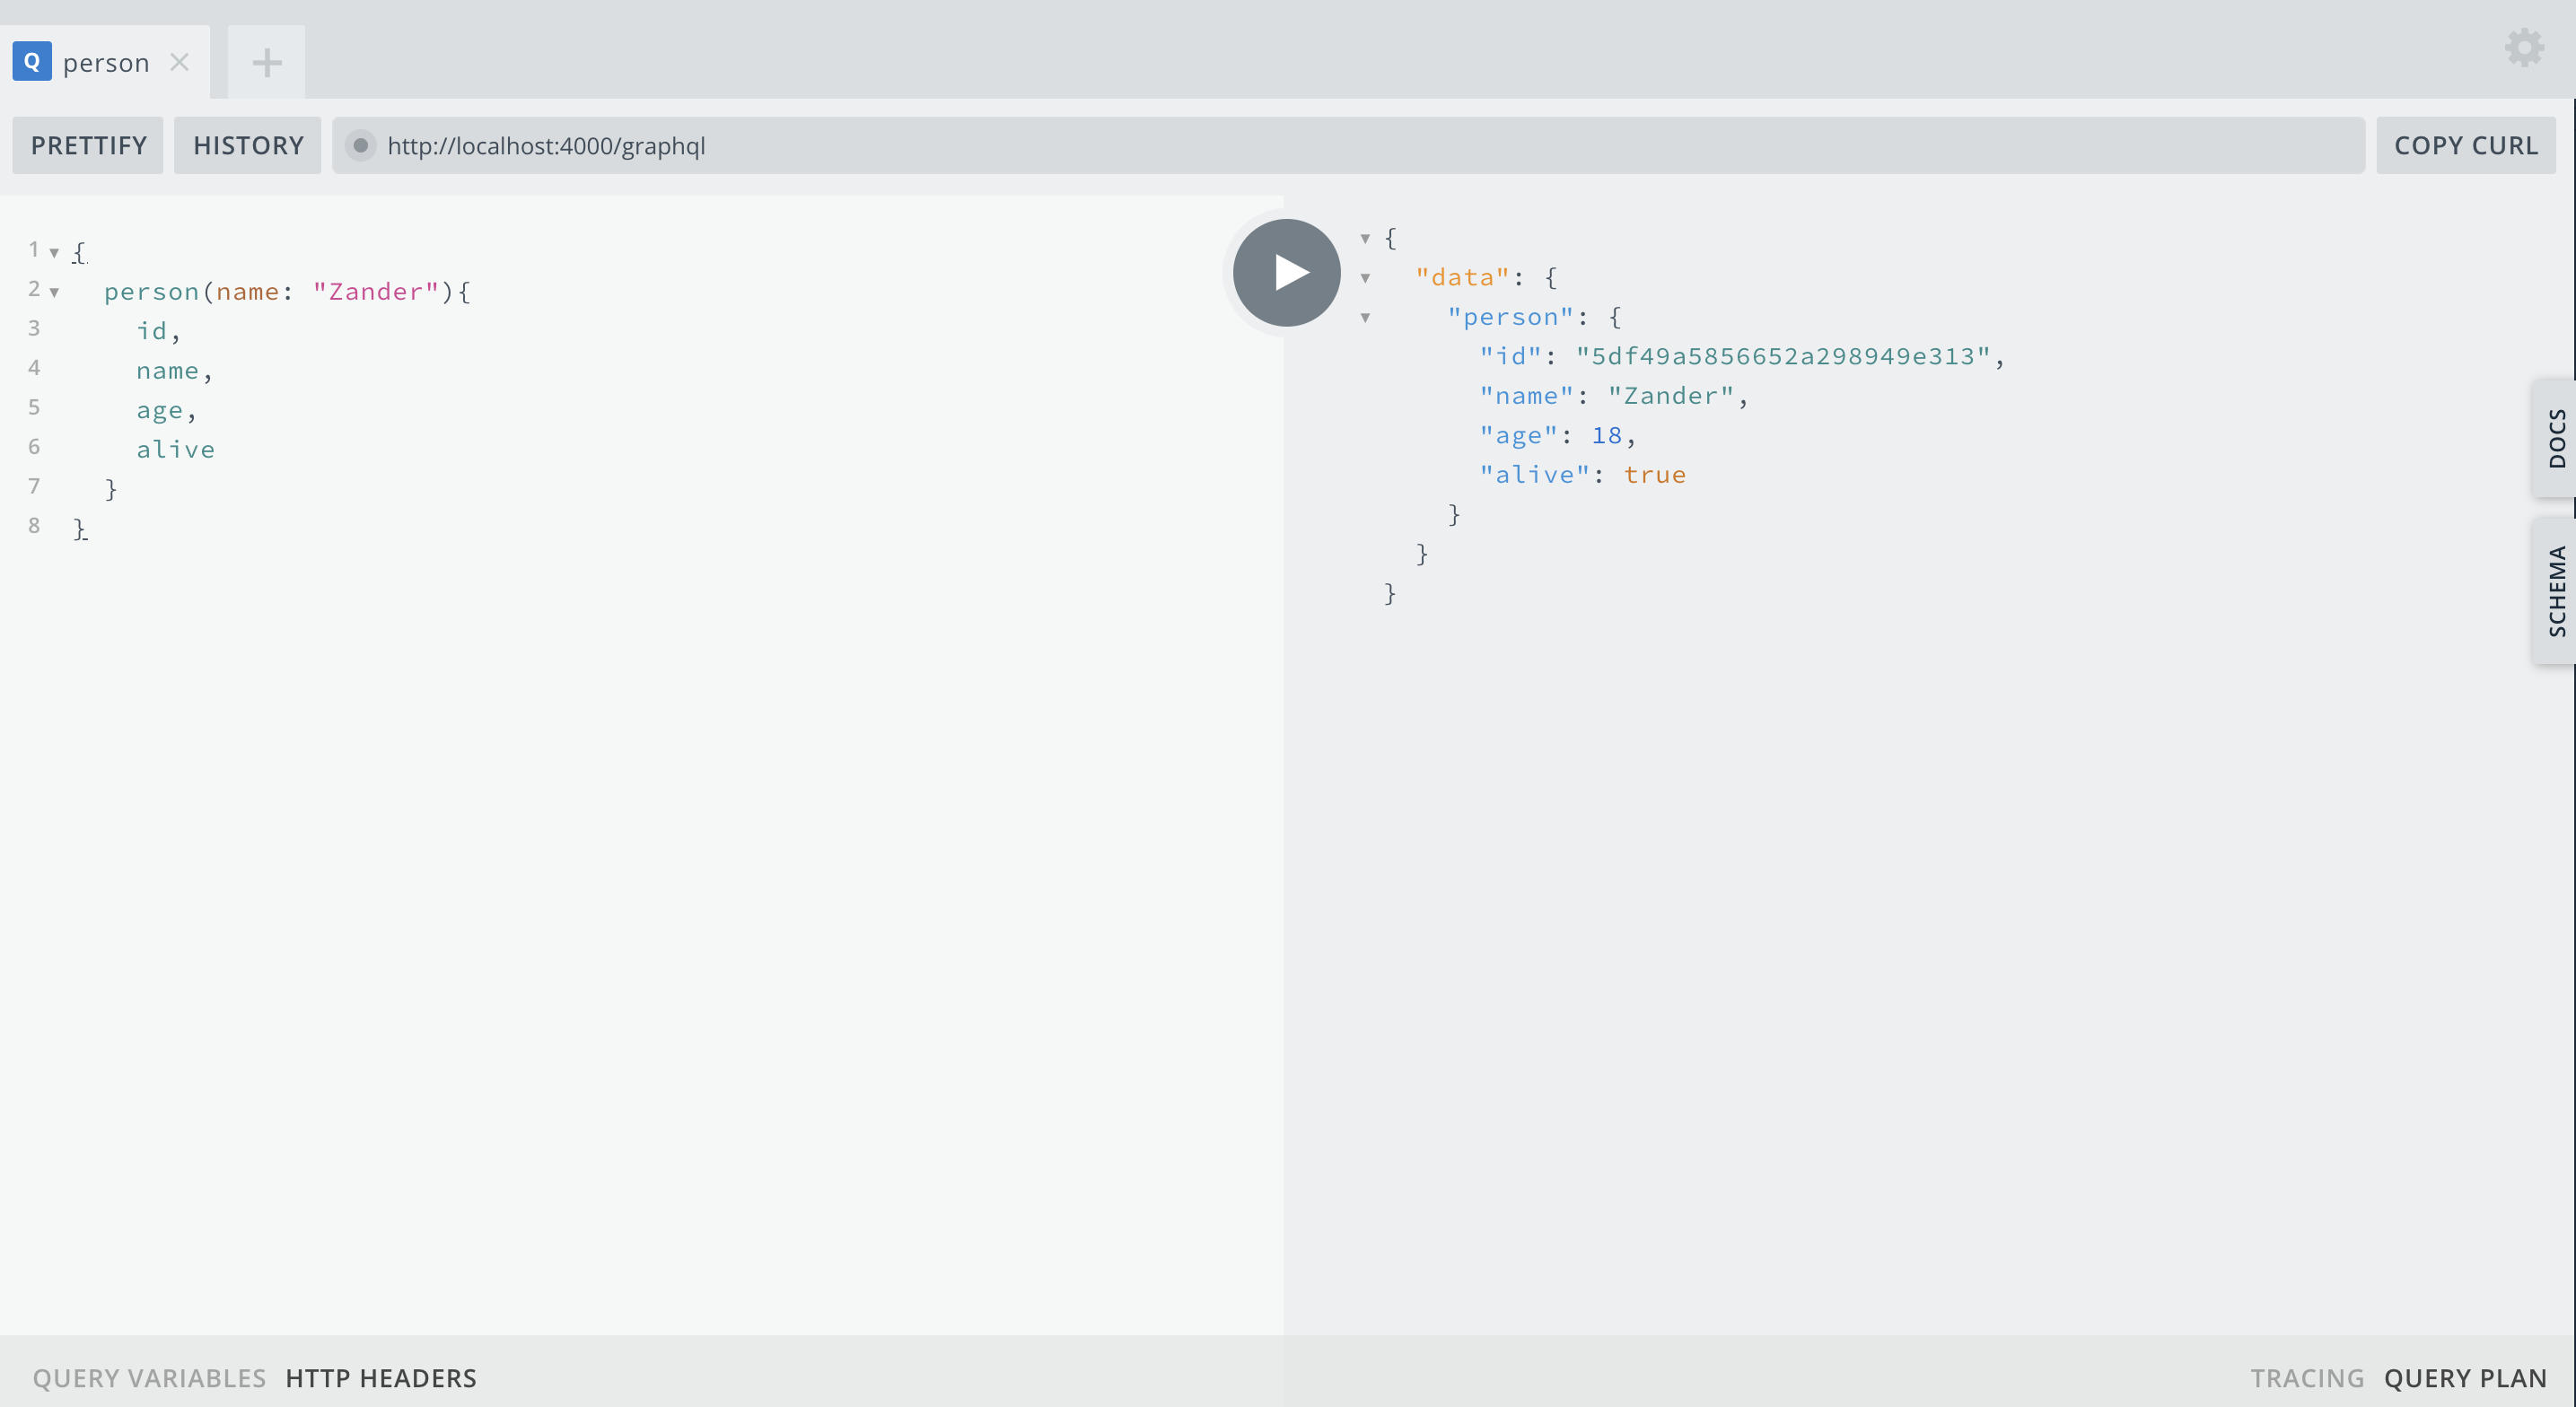
然后在 GraphiQL 中执行这个简单的 Query:
{
  person(name: "Zander"){
    id,
    name,
    age,
    alive,
    friends{
      name,
      tel,
      email
    }
  }
}
按照 GraphQL 的机制会这样执行查询流程:
第一步:先查询 persons 集合中 name 为 Zander 的信息:
1
2
3
| resolve: (parent, arg) => {
return Person.findOne({name: arg.name});
}
|
第二步:对于 Zander 的 friends 数据,GraphQL 会拿着friends数组中的 id 去匹配 friends 集合的_id字段,执行的查询大概是这样:
 1
 2
 3
 4
 5
 6
 7
 8
 9
10
11
12
13
| resolve_1: (parent, arg) => {
return Friend.find({_id: parent.id_1});
}
resolve_2: (parent, arg) => {
return Friend.find({_id: parent.id_2});
}
...
resolve_n: (parent, arg) => {
return Friend.find({_id: parent.id_n});
}
|
如此,便产生了 对数据库的 N + 1次请求。
我倒觉得叫1 + N 问题更合适🌚,因为总是先进行1次主集合数据查询,然后再去查询关联的 N 条数据。
Whatever! 先来解决问题吧~
对于 N + 1问题,GraphQL 的开发者 Facebook 提供了 DataLoader 来作为通用的解决方案,为什么说是「通用」呢?因为几乎每种语言都有 DataLoader 的实现方式——JavaScript、Java、Python、PHP、Ruby......。DataLoader 通过批处理和缓存来减少 API 对数据库的访问次数。
批处理是 DataLoader 的主要功能,作用是如果需要多次访问数据库,则将这些功能类似的请求合并处理。
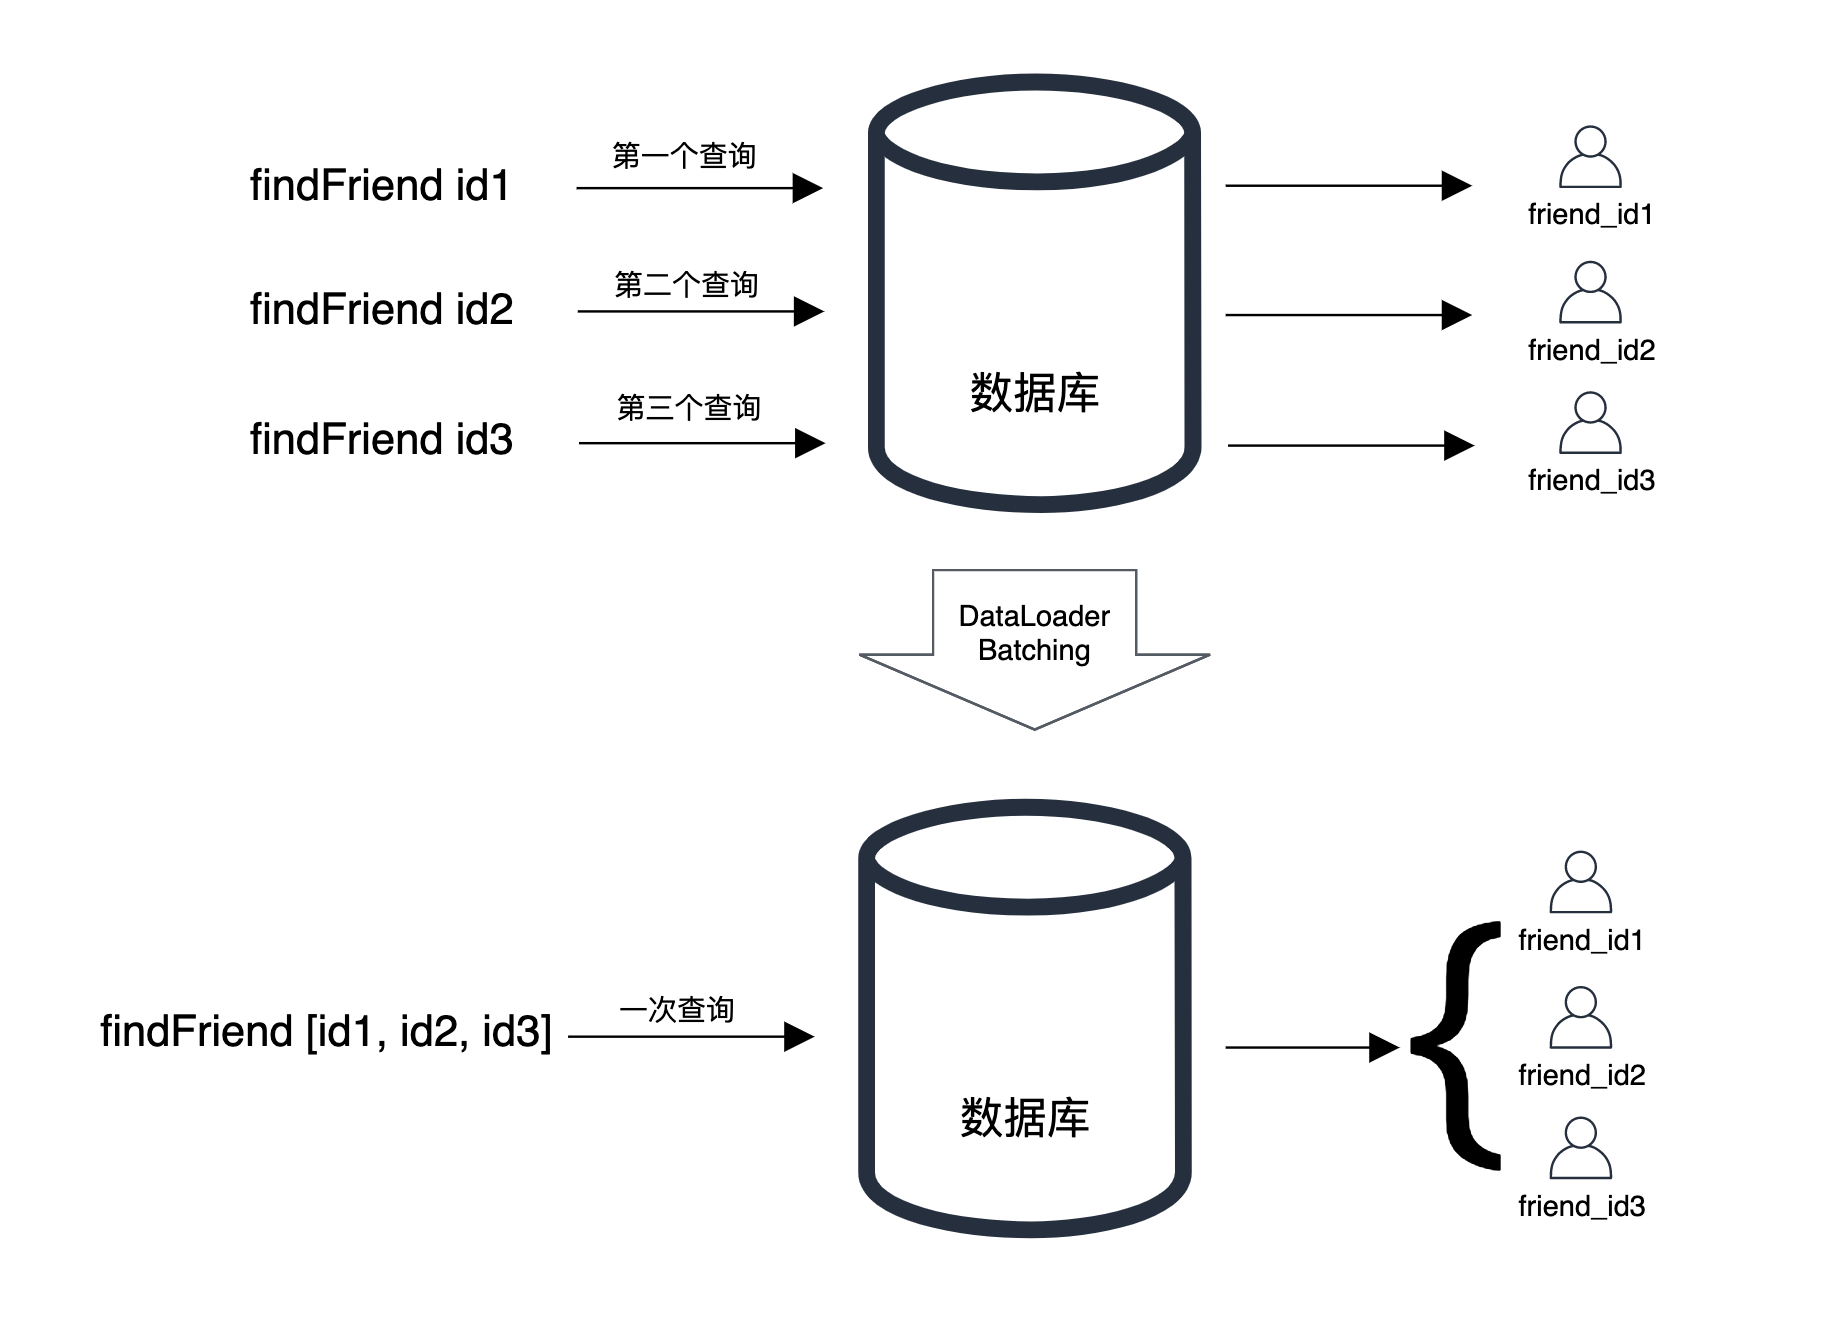 ◎ 批处理
◎ 批处理
使用 DataLoader 的批处理函数需要满足两点:
- 批处理函数接受一个数组参数,返回的查询结果数组长度与参数数组长度相同且索引对应
- 返回的数组必须为 Promise 对象
1. 安装 DataLoader
1
| $ npm install dataloader --save
|
2. 引入 Dataloader,定义 Dataloader 对象,将其挂载到所有请求的上下文中
 1
 2
 3
 4
 5
 6
 7
 8
 9
10
11
12
13
14
15
| const DataLoader = require('dataloader');
app.use('/graphql', graphqlHTTP(req => {
const friendLoader = new DataLoader(
keys => Friend.find({_id: {$in: keys}})
)
const loaders = {
friend: friendLoader
}
return {
context: {loaders},
schema,
graphiql: true
}
}));
|
网上很多案例都对返回的查询结果做了Promise.all()处理,但是在 Mongoose 中,所有的数据库操作返回的结果都是一个 Mongoose Documents,本身就是一个 Promise 对象,因此不用做相应的处理。
3. 修改获取 friends 数据的方法
 1
 2
 3
 4
 5
 6
 7
 8
 9
10
11
12
13
14
15
16
17
18
19
20
21
22
23
24
25
26
27
28
29
30
31
32
33
| const personType = new GraphQLObjectType({
name: 'person',
description: "人物信息",
fields: () => ({
id: {
type: GraphQLID
},
name: {
type: GraphQLString,
name: "姓名",
description: "姓名"
},
age: {
type: GraphQLInt,
name: '年龄',
description: '年龄'
},
alive: {
type: GraphQLBoolean,
name: '是否活着',
description: '是否活着'
},
friends: {
type: new GraphQLList(friendType),
name: '朋友',
description: '朋友们的信息',
resolve: (parent, args, {loaders}) => {
// return Friend.find({_id: {$in: parent.friends}}); // 不使用Dataloader
return loaders.friend.loadMany(parent.friends);
}
}
})
})
|
你以为这就完了吗?是的没错🤪然而就这点简单的代码竟花费了我数天的时间,原因是网上竟没有找到完完全全的 Express + Mongoose + MongoDB + GraphQL + DataLoader 实例,完成这个实例确是摸石头过河,报了很多错、踩了很多坑才终取得真经。
然而如何去验证成功使用 DataLoader 解决了 N + 1是个问题,也就是目前还不知道如何监控 MongoDB 集合的查询次数、时间等信息,使用 mongostat、mongotop 等监控方法都没能达成此目的。
Apollo GraphQL 是一个用于创建 GraphQL 客户端和服务器的完整独立系统,其完整性和独立性体现在不管你服务端使用的是 Java、Node.js、Python 或其它语言,也不管你客户端运用的是 React,React Native,Vue 还是 Angular,它不依赖于特定语言和框架,能很好地满足你对 GraphQL 的实现,并且是一套成熟完整的生态系统。
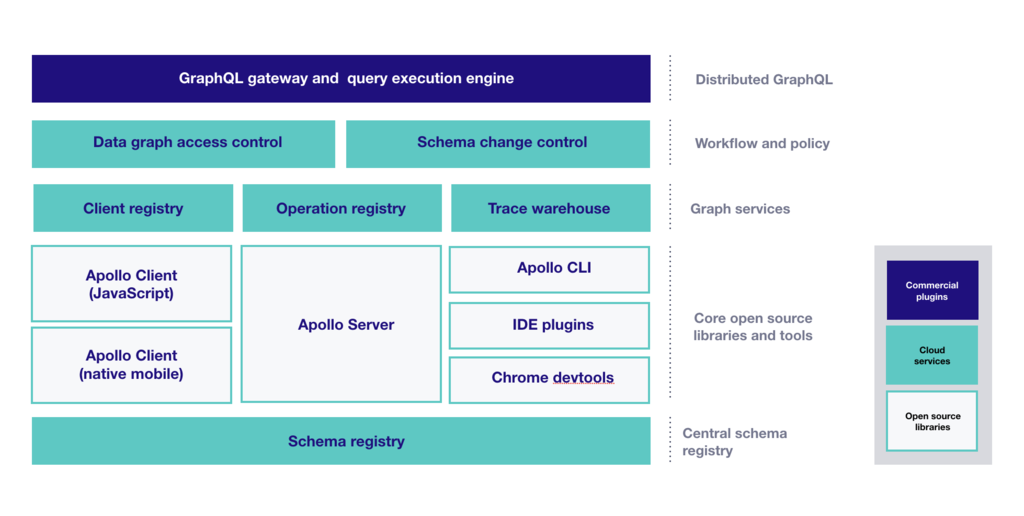 ◎ Apollo GraphQL 生态
Apollo Server 可以与流行的几个 Node.js 框架集成,包括 Express、Fastify、Koa 和 Hapi,下面介绍如何在 Express 中搭建 Apollo Server。
1. 设置项目
还是使用 express-generator 搭建项目目录,使用 Mongoose 连接 MongoDB,接下来安装依赖项:
1
| $ npm i apollo-server-express graphql
|
2. 初始化 Apollo Server
 1
 2
 3
 4
 5
 6
 7
 8
 9
10
11
12
13
14
15
16
17
18
19
| const { ApolloServer } = require('apollo-server-express');
const typeDefs = require('./schema/schema'); // GraphQL的Schema
const resolvers = require('./schema/resolvers'); // API方法
const server = new ApolloServer({
typeDefs,
resolvers,
playground: { // 配置playground
settings: {
'editor.theme': 'light'
}
}
});
server.applyMiddleware({ app }); // 应用中间件,传递数据到express的app,必须位于`const app = express();`下方
app.listen({ port: 4000 }, () =>
console.log(`🚀 Server ready at http://localhost:4000${server.graphqlPath}`)
)
|
3. 添加 Schema
Apollo Server 中内置了 gql 模板字符串,新建 schema/schema.js 目录,定义 GraphQL 的 Schema(类型系统):
 1
 2
 3
 4
 5
 6
 7
 8
 9
10
11
12
13
14
15
16
17
18
19
20
21
22
| const { gql } = require('apollo-server-express');
const typeDefs = gql`
type Person {
id: String
name: String
age: Int
alive: Boolean
}
type Friend {
id: String
name: String
tel: String
email: String
}
type Query {
allPerson: [Person]
person(name: String!): Person
}
`;
module.exports = typeDefs;
|
4. 添加返回数据的方法
resolvers 用于定义 GraphQL 操作(Query、Mutation、Subscriptoin)返回的具体数据,在 /src/schema/resolvers.js 中添加:
 1
 2
 3
 4
 5
 6
 7
 8
 9
10
11
12
13
14
| const Person = require('../models/person');
const resolvers = {
Query: {
allPerson: () => {
return Person.find();
},
person: (parent, args) => {
return Person.findOne({name: args.name});
}
}
};
module.exports = resolvers;
|
5. 在 playground 中测试 GraphQL API
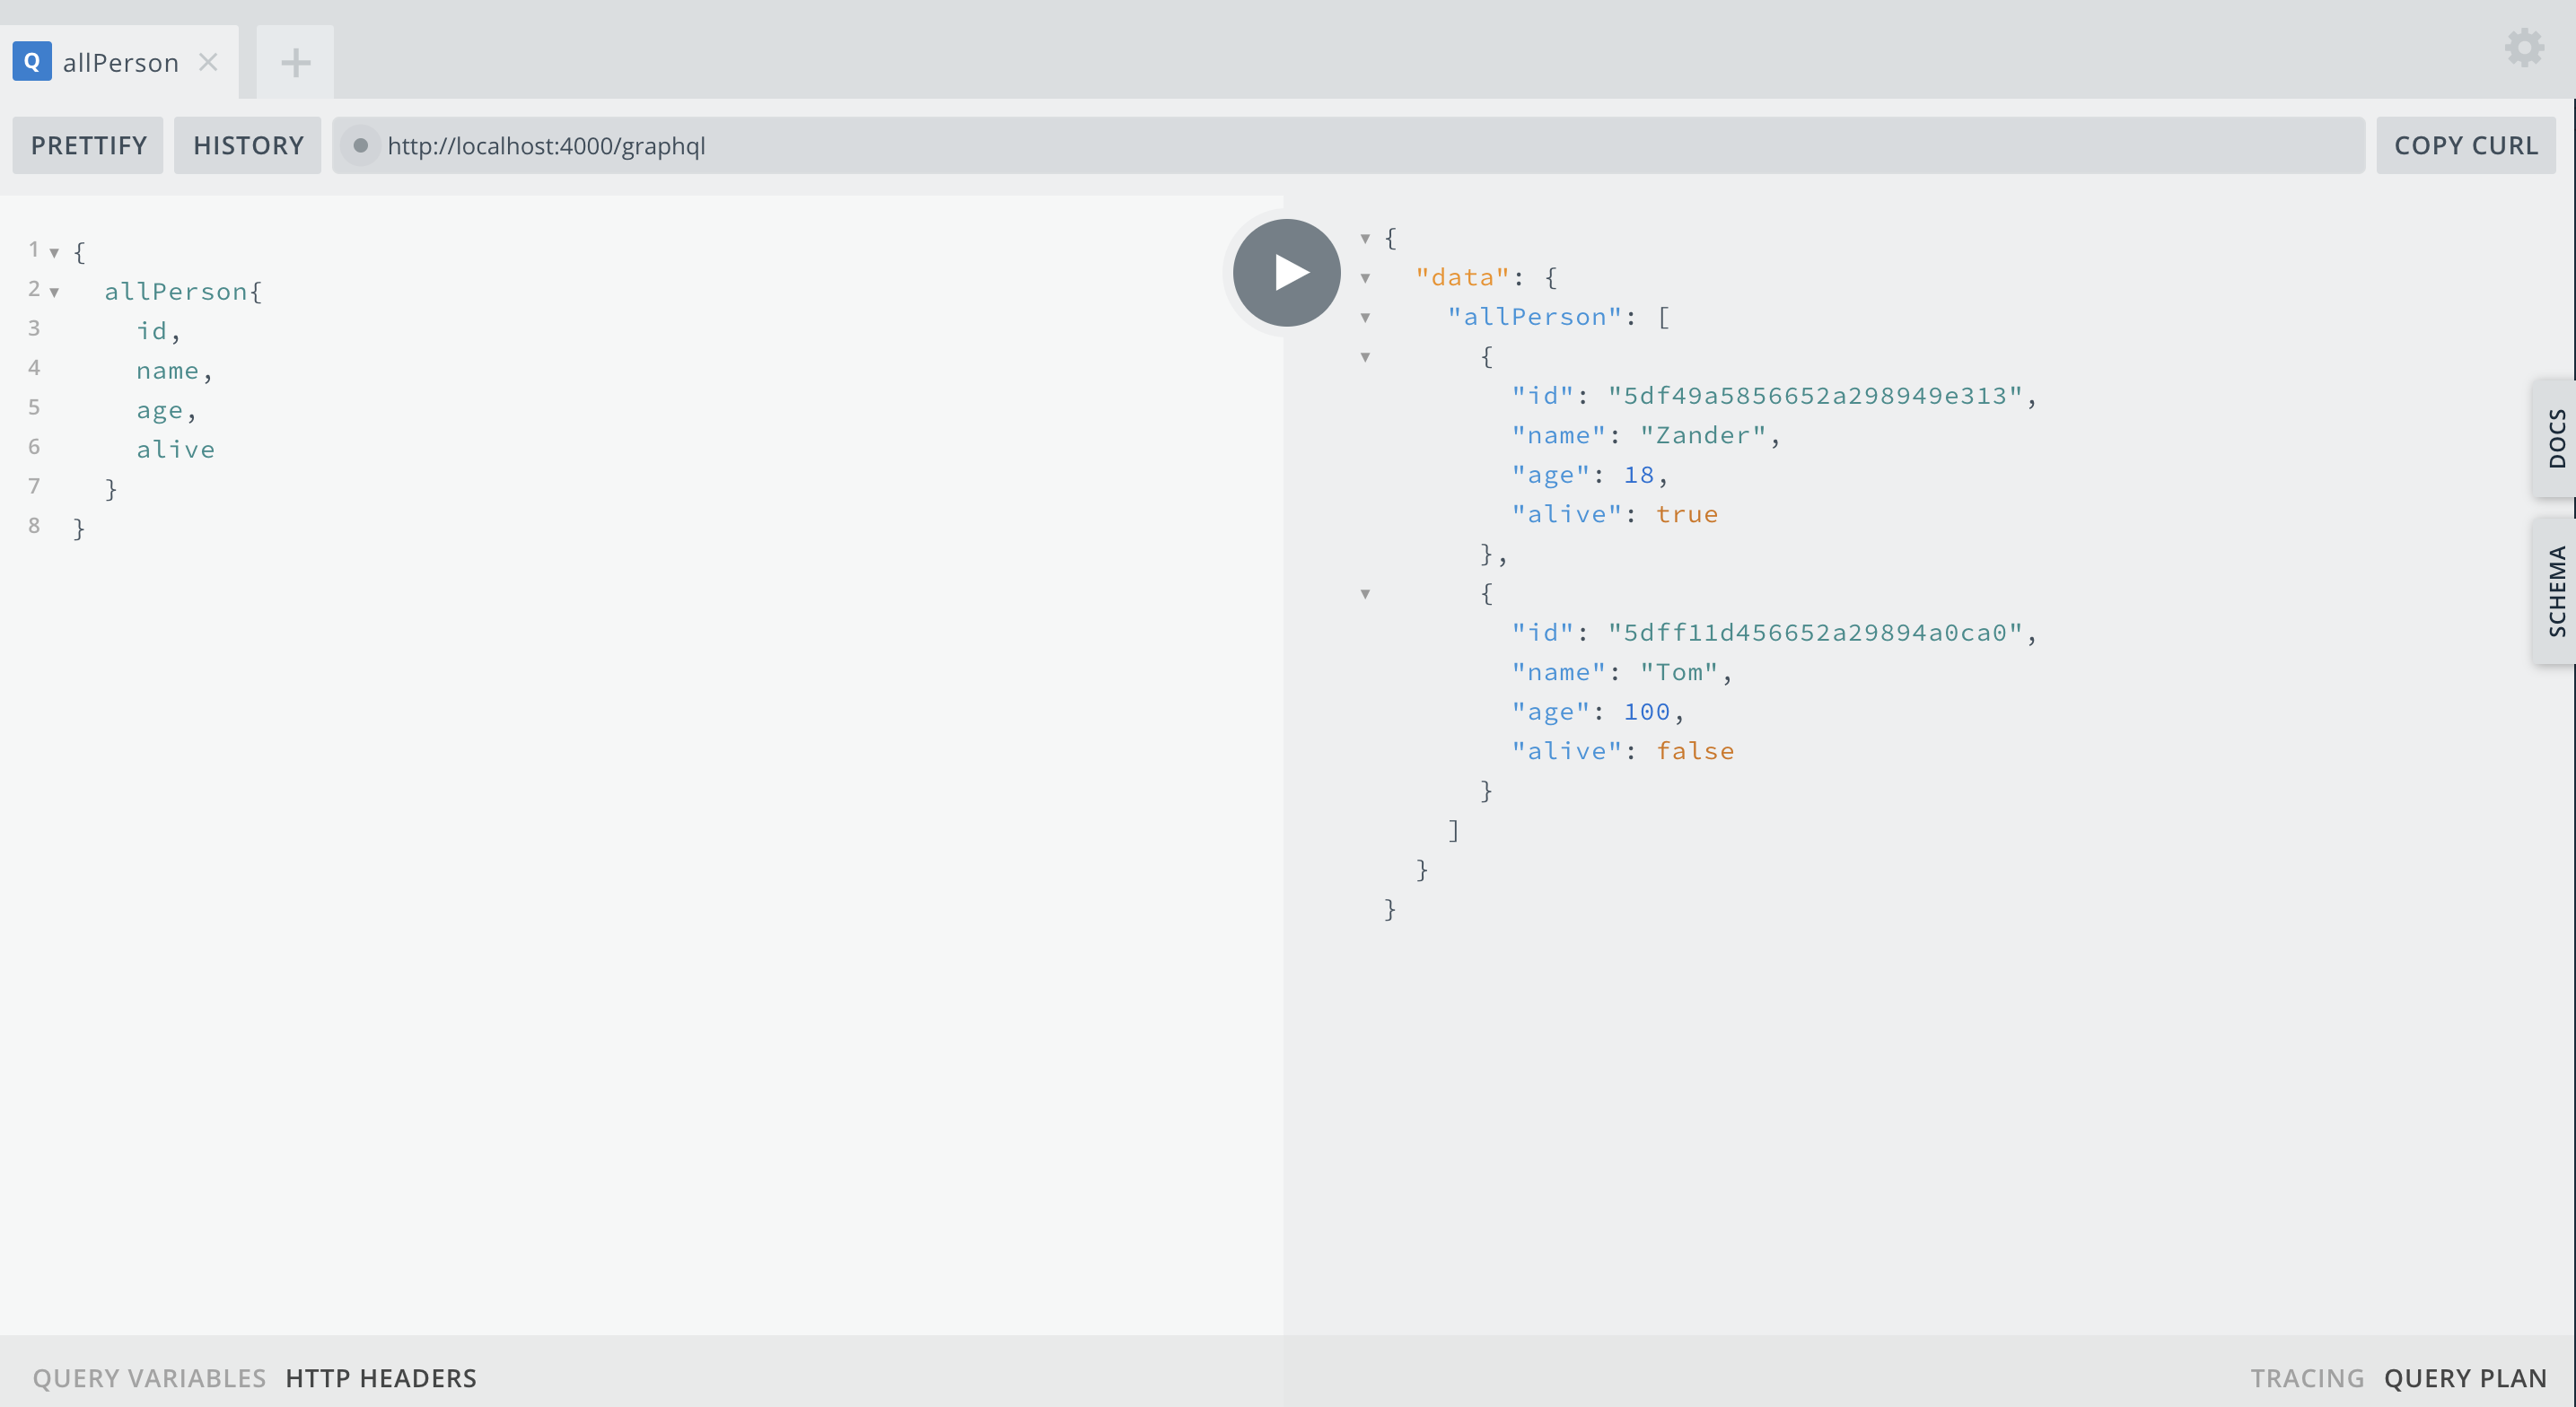 ◎ 所有人物信息
 ◎ 通过姓名查询人物信息
Vue Apollo 通过声明式查询将 Apollo 集成到 Vue 组件中,是 Vue 中使用 GraphQL 的官方实现方法。
1. 安装
Vue CLI 3 中安装 Apollo 十分简单,直接添加插件即可:
建议可选项:
? Add example code? No
? Add a GraphQL API Server? No
? Configure Apollo Engine? No
当然你要是头铁(依赖项实在太多)也可以选择手动安装。
2. 配置 vue-apollo
生成目录中的 vue-apollo.js 是 apollo 的配置文件,需要做的有两点:
- 由于服务端中没有设置 WebSocket 端点,需要将配置文件中的
wsEndpoint 设置为null。 - 设置 http 端点
httpEndpoint 为 Apollo 服务端中所设置的 GraphQL 请求入口 URL,由于我服务端并没有特殊配置入口 URL,此处无需改动。
3. 在 Vue 组件中使用 GraphQL 查询语句
在组件中使用 GraphQL 查询有三种方式,而使用 GraphQL API 返回的数据就和使用 data 中的数据一样简单:
**方式一、**在组件中引入 gql 模板字符串语法,然后在组件中声明 apollo 查询来定义查询语句:
 1
 2
 3
 4
 5
 6
 7
 8
 9
10
11
12
13
14
15
16
17
18
19
20
21
22
23
24
25
26
27
| <template>
<div>
<div v-for="person in allPerson" :key="person.id">
name: {{ person.name }},
age: {{ person.age }},
alive: {{ person.alive === true? "是":"否" }}
</div>
</div>
</template>
<script>
import gql from "graphql-tag";
export default {
name: "HelloWorld",
apollo: {
allPerson: gql`
query {
allPerson {
id
name
age
}
}
`
}
};
</script>
|
**方式二、**为了查询语句的可重用性和可维护性,建议采用引用公共 gql 语句的方式。新建 /src/graphql/ 目录,在目录下新建.gql文件来定义项目所需的 GraphQL 操作,然后在组件中引入并使用:
1
2
3
4
5
6
7
8
9
| // 文件位置:/src/graphql/allPerson.gql
query allPerson{
allPerson{
id,
name,
age,
alive
}
}
|
在组件中使用:
 1
 2
 3
 4
 5
 6
 7
 8
 9
10
| <script>
import allPerson from '../graphql/allPerson.gql'
export default {
name: "HelloWorld",
apollo: {
allPerson: allPerson
}
};
</script>
|
**方式三、**使用 Apollo 组件也是一种办法,这种方式的优点在于可以脱离 Vue 组件的<script>标签,适用于在 Vue 公共组件中使用,但也太不优雅了🙃:
 1
 2
 3
 4
 5
 6
 7
 8
 9
10
11
12
13
14
15
16
17
18
19
20
21
22
23
| <template>
<div class="hello">
<ApolloQuery
:query="gql => gql`
query {
allPerson {
id
name
}
}`"
>
<template v-slot="{ result: { loading, error, data } }">
<div v-if="data">
<div v-for="person in data.allPerson" :key="person.id">
name: {{ person.name }},
age: {{ person.age }},
alive: {{ person.alive === true? "是":"否" }}
</div>
</div>
</template>
</ApolloQuery>
</div>
</template>
|
当然,这三种方式带来的结果是相同的:
 ◎ 页面渲染数据
GraphQL & DataLoader:
Zero to GraphQL in 30 Minutes | YouTube
Avoiding n+1 requests in GraphQL, including within subscriptions | Medium
How to use Mongoose with GraphQL and DataLoader? | Stack Overflow
Apollo:
使用 NodeJS 创建一个 GraphQL 服务器 | 掘金
Learn GraphQL with Vue Apollo in 20 minutes! | YouTube
Using Apollo / GraphQL with Vue.js | Alligator