前言
通常,GitLab 的操作都是通过 Web 界面或命令行来完成的,但 GitLab 也提供了简单而强大的开放 API 来自动执行 GitLab 相关操作,查看项目信息、提交 Issues、合并分支……统统都在 docs.gitlab.com,GitLab API 大多为 REST API,但也同样支持 GraphQL API,并且 v5 版本的 API 将全部基于 GraphQL API,as Facebook does.
授权认证
绝大多数的 GitLab API 都是需要身份验证的,这毋庸置疑,其它公司的内部数据不能随随便便就被获取到,即使是公司内部也会有各个 Group 或 Project 的权限设置。
再以使用 GitLab API 的目的出发——主要是为了在公司 Portal 网站中显示 GitLab 中的项目信息、成员信息、Issues 等,这就要求在用户登录 Portal 网站时获取其 GitLab 内具体权限,以显示其权限对应的 GitLab 数据。问题出来了:Portal 网站如何经过 GitLab 的同意来获取用户数据?
API 的使用无非 CRUD,按照 GitLab API 清晰完整的文档来就可以了,如何进行身份验证才是重头戏,GitLab API 的身份验证有四种方法:
1. OAuth2 tokens
OAuth2 即 OAuth 2.0版本,是一个关于授权的开放网络标准,也是目前应用最广泛的授权认证方式。它的运行流程是这样的:
[1]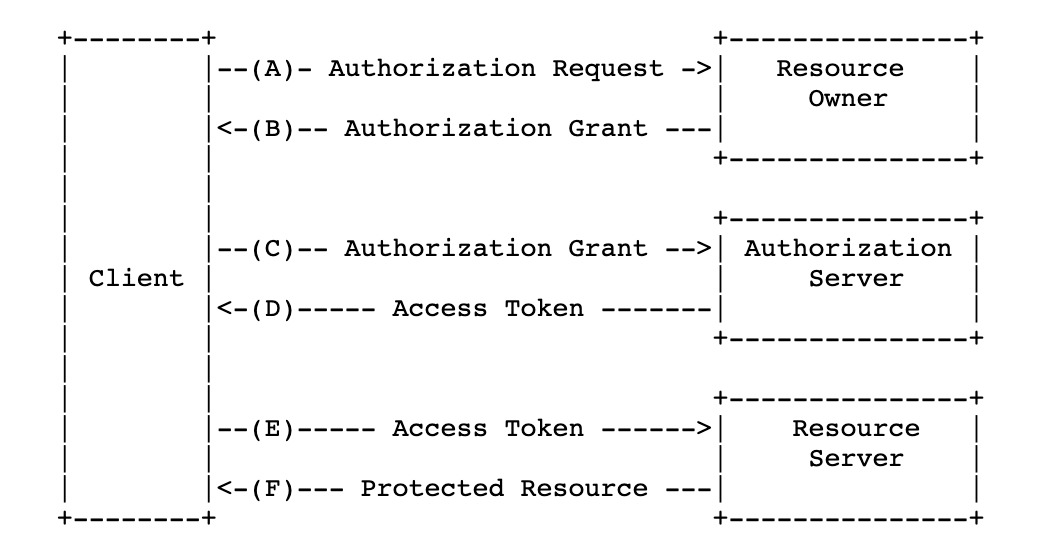 ◎ AOuth 2.0 Workflow
简单来说就是在第三方应用(客户端 Client)需要资源服务器(Resource Server)的数据时,资源拥有者(Resource Owner)同意后授权给客户端,客户端向认证服务器(Authorization Server)申请令牌(Token),认证服务器确认后发放令牌,客户端就可以拿着令牌去获取资源服务器的数据了。
这些步骤中最重要的又在于客户端如何得到用户的授权(Authorization Grant)从而拿到令牌(Access Token),OAuth 2.0提供了四种授权方式,其中授权码模式(Authorization Code Grant)是最严密完整的,也是绝大多数网站作为资源服务器时采用的授权方式(包括 GitLab)。授权码模式流程图:
[2] ◎ Authorization Code Workflow
以 GitLab 的 OAuth2 验证方式解释一下此流程(开发者视角):
第一步、创建应用
在 GitLab Web 界面的 Setting ➡️ Applications 中注册用于提供 OAuth 验证的应用。重定向 URI(Redirect URI)本应设为第三方应用(本例中即为公司 Portal 网站)的线上 URI,处于开发阶段时也可设为本地应用运行后的访问路径,如http://localhost:8080/login,此重定向 URI 的作用下文会详述。页面还会要求选择 Scopes,表示此应用的授权范围,应根据第三方应用的具体需求选择,我选 api,嘿嘿嘿,应用成功创建后会显示其具体信息,包括应用 Id Application Id、应用密钥Secret、回调 URLCallback url 和权限 Scopes。
GitLab 要求 Redirect URI 中不能包含一些特殊字符,如
#。在 Vue 中如果 vue-router 采用了 hash 模式,就与 Redirect URI 的格式要求冲突了,因此 vue-router 应改为采用 history 模式,详参 HTML5 History 模式。
第二步、请求授权码
 ◎ Partol 中的授权按钮
点击 Portal 中 「GitLab 授权」按钮时使用 location.href 跳转至授权页面:
https://gitlab.zander.com/oauth/authorize?client_id=4e1fe77ba1d43b151428d907574er866a48af8dbc8766ea839a84a88c6dace39&redirect_uri=http://localhost:8080/login&response_type=code&state=zander&scope=api
URI 中的参数包括:
| 参数 | 是否必须 | 含义 |
|---|---|---|
| client_id | true | 注册 GitLab 应用成功后的 Application Id |
| redirect_uri | true | 注册应用时设置的重定向 URI |
| response_type | true | 返回的类型,授权码模式即为code |
| state | false | 用于确认请求和回调的状态,OAuth 建议以此来防止 CSRF 攻击[3] |
| scope | false | 权限设置,范围不得超出创建应用时的配置,以空格分隔 |
第三步、用户授权
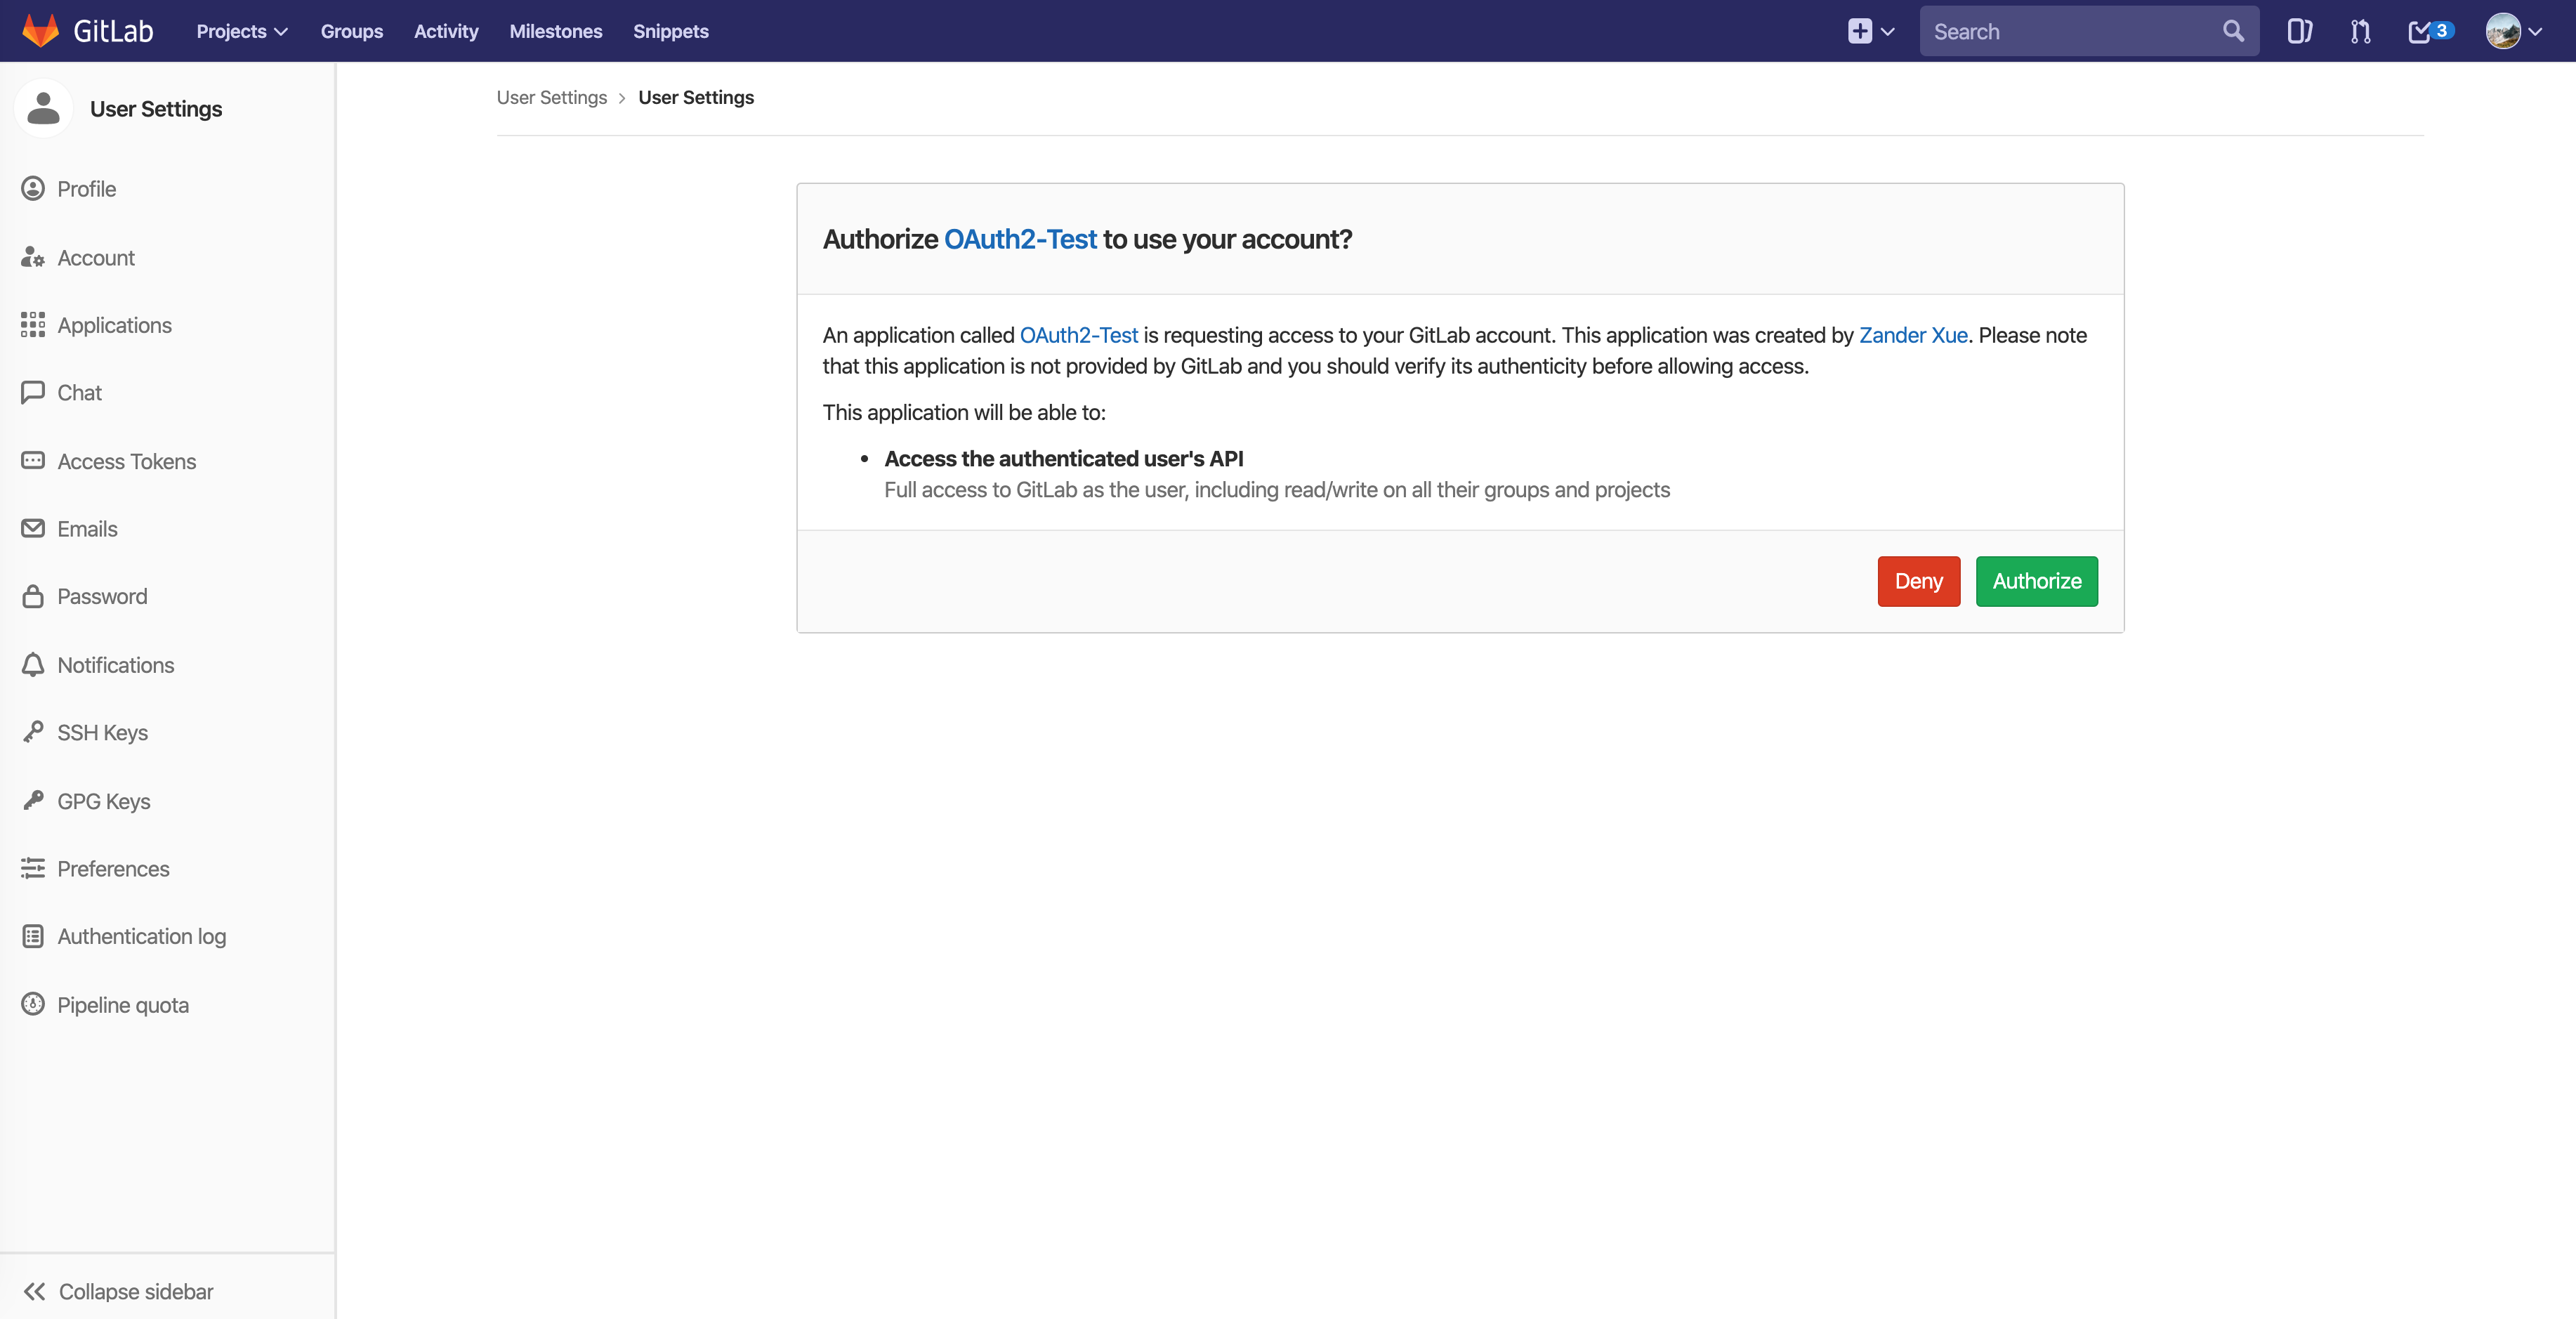 ◎ 授权页面
发送请求后网页会跳转到 GitLab 的授权页面,先要求用户登录 GitLab,然后询问用户是否同意授权🥺。用户点击同意后页面便会返回一个包含授权码 code 和参数 state(如果你传了它的话)的重定向 URI 并跳转至对应的网页,即网页的地址栏变成了这样:
http://localhost:8080/login?code=90792302acc2a0724d44c74f43d0fd77f005723c9ae5def965b02675f532949a&state=zander
第四步、获取令牌 Token
既然拿到了 code,嘿嘿嘿😎,只需要一个 Post 请求就能拿到可任意调用 GitLab API 大军的虎符🐯—— Access Token。要注意的是,获取 Token 的操作是需要在第三方应用的后台完成的,以保证数据的安全性。
POST https://gitlab.zander.com/oauth/token
参数包括:
| 参数 | 是否必须 | 含义 |
|---|---|---|
| client_id | true | 注册应用的 Application Id |
| client_secret | true | 注册应用的 Secret |
| code | true | 上面获取到的授权码,但是其有效期很短,一般为10min |
| grant_type | true | 授权方式,authorization_code |
| redirect_uri | true | 颁发令牌后的回调网址 |
GitLab 收到此请求后便会向参数中的redirect_uri网址发送一段 JSON 数据,虎符在此:
| |
2. Personal access tokens
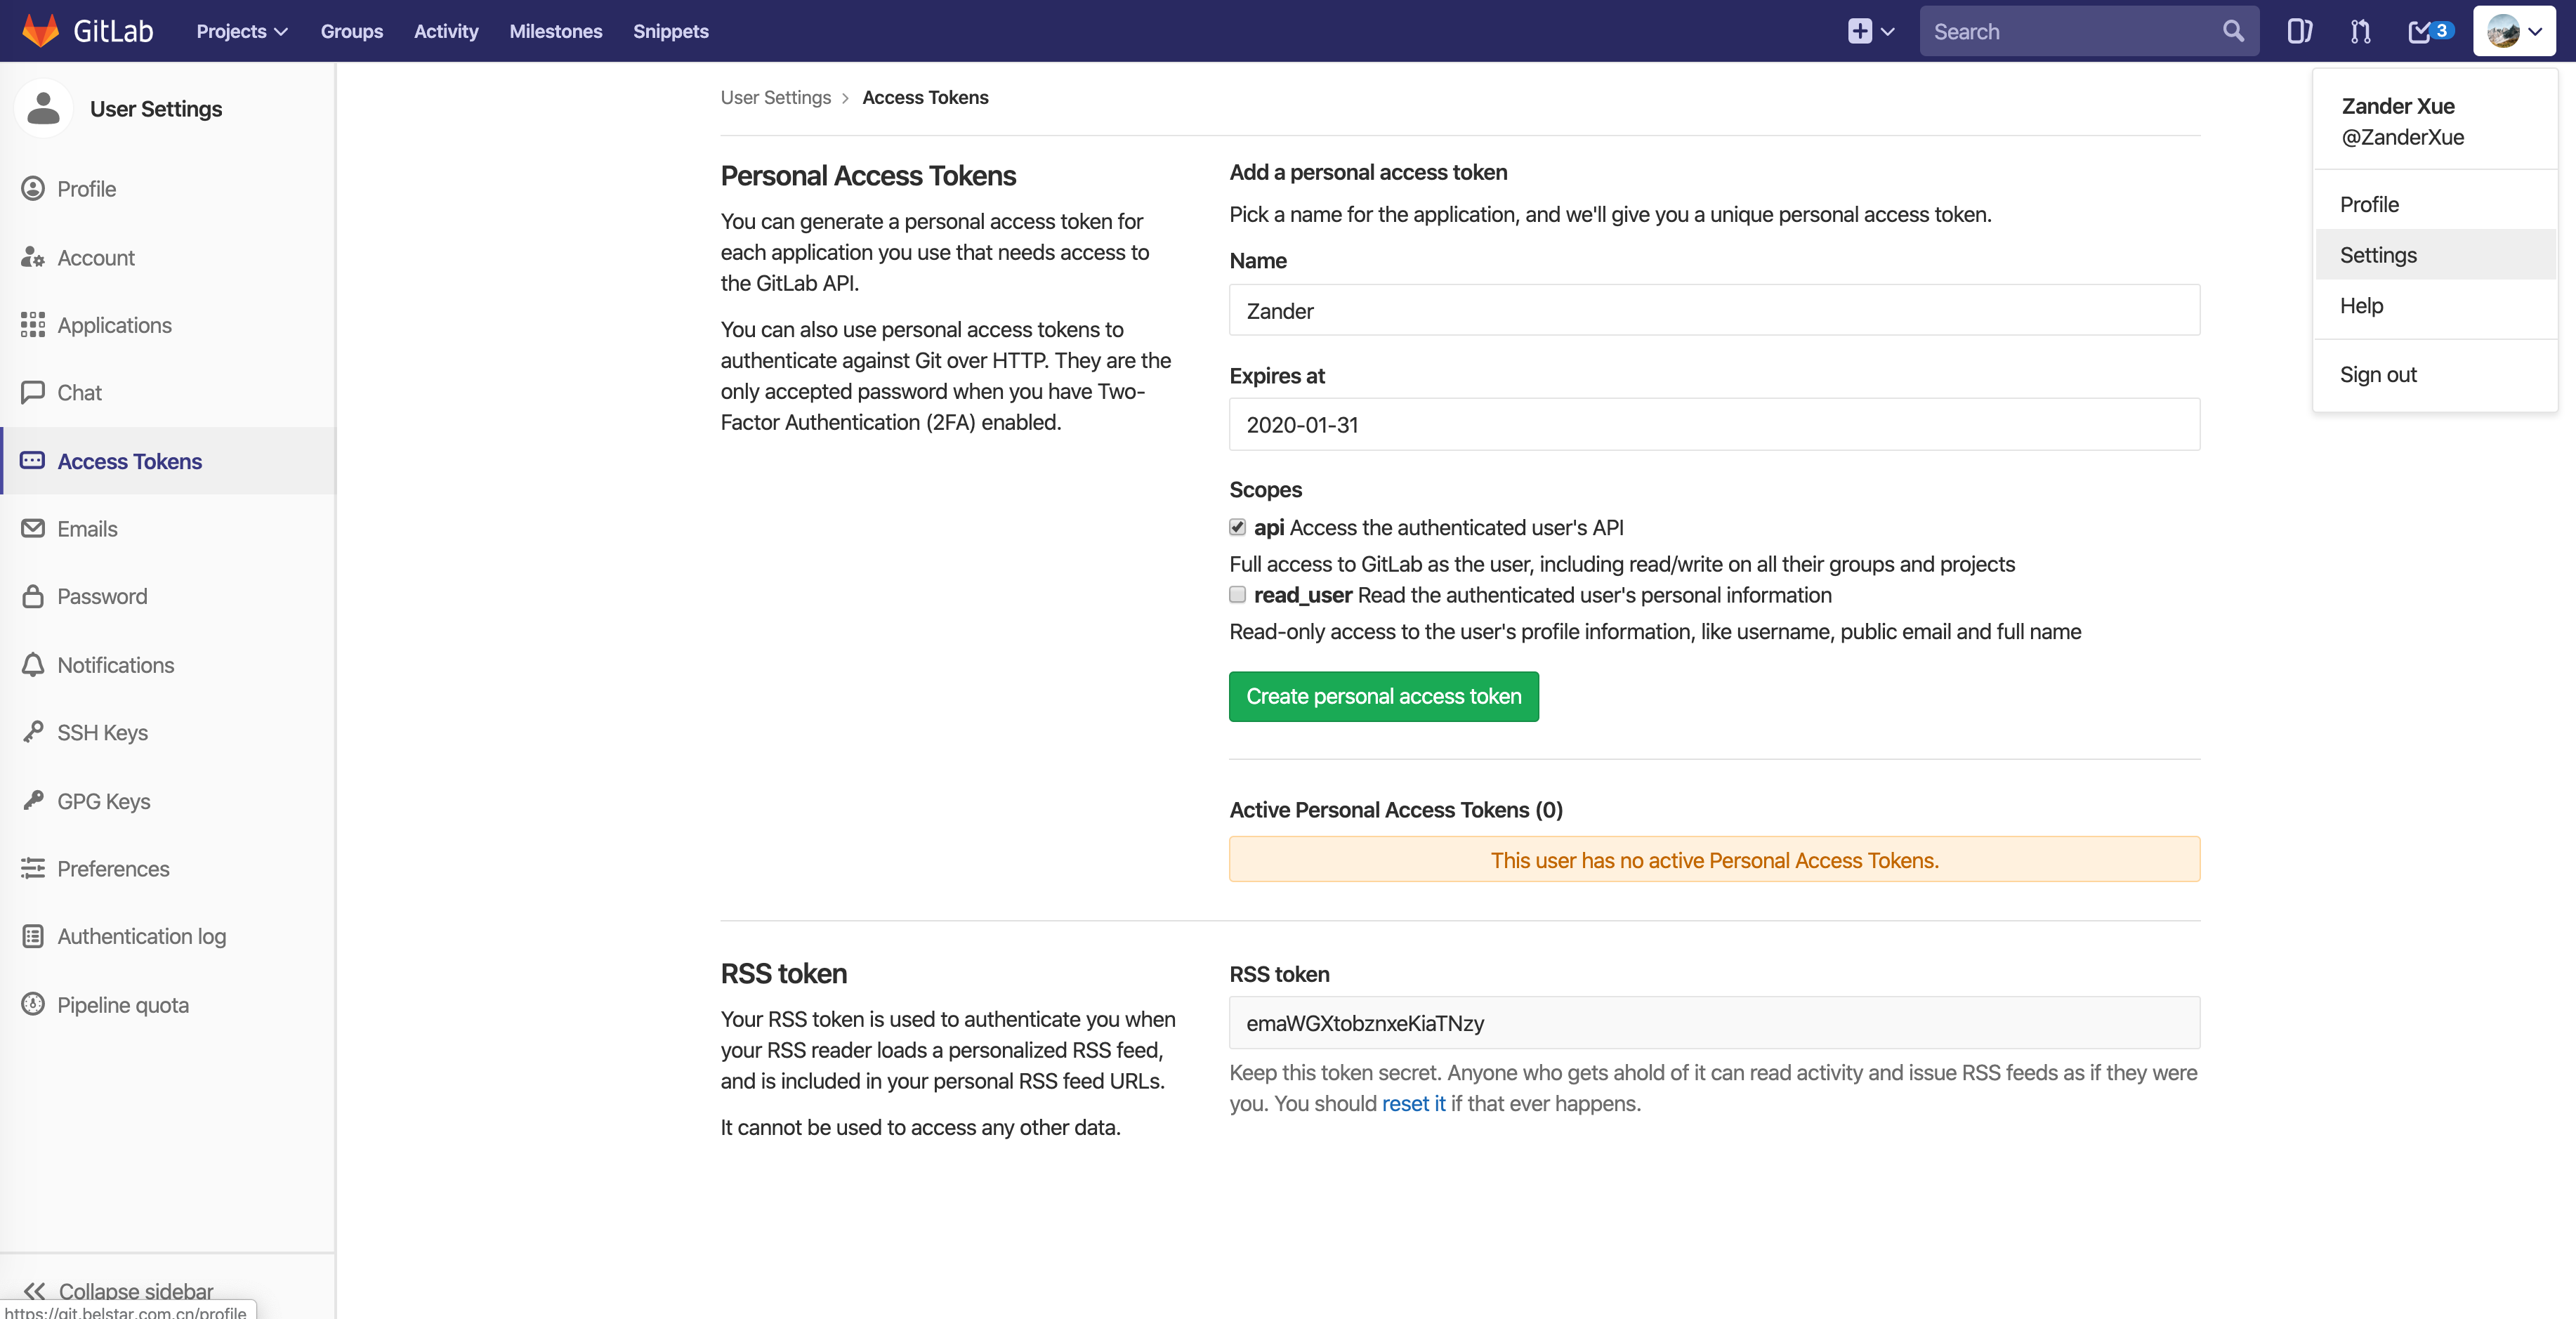 ◎ 生成 Personal access token
GitLab Web 界面中进入 Seting ➡️ Access Tokens,输入名字和到期日期就可以生成对应的 Access Token,注意生成后需要保存好 Token,因为生成的这条 Token 不会再出现第二次,虽然你可以继续生成新的 Token😑。最简单的一种验证方式,但是此方式要求用户必须登入 GitLab Web 页面进特定操作,不可取,自己玩玩倒是很方便。
3. Session cookie
登录 GitLab 应用程序时会生成 Session cookie,之后 GitLab 中的 API 都通过此 cookie 进行身份验证,也就是人家官网使用的验证方式,不能通过特定 API 生成这个 cookie,排除。
4. GitLab CI job token
在 GitLab 内置的持续集成工具 GitLab CI 的 Job 中使用,每个 Job 可配置一个 CI job token,使用方式类似用户名和密码。
使用
有了 Token,就有了使用 GitLab API 的🔑,但是不同 Token 的使用方式也不同:
AOuth 2.0获取的 Token 类型是 bearer-tokens,需要在 GitLab API 请求中加入 Key 为
Authorization,Value 为Bearer <Token>的 Header。Personal access tokens 获取的是 Private-Token,需要加入 Key 为
Private-Token、Value 为 Token 值的请求 Header。
所有的 GitLab API 前缀均为https://gitlab.example.com/api/v4/,使用方式与常见 API 无异,例:
| |
此 API 可获取到用户在 GitLab 上所有的可见项目列表:
| |